Fall Wreath with Felt Rosettes
Get into the spirit of fall with this unique, handcrafted wreath in warm autumn colors! The wreath is super easy to make and very inexpensive—I purchased all my materials for under $10!
Fall Wreath with Felt Rosettes
Materials
- Rosette Template (Click here to download template)
- Grapevine wreath
- Felt (use any colors you’d like for your flowers)
- Fall berry picks (optional)
Tools
- Scissors
- Double-stick tape
- Hot glue gun and glue
Directions
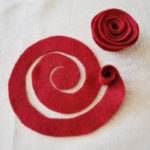
- Download and print the Rosette Template. Use the template to cut the “swirl” shapes out of your felt. You can adjust the size of your swirl to create larger or smaller rosettes.
- Starting at the edge of the swirl, roll it towards the center. The tighter you roll it up, the smaller the rosette will be; if it is rolled more loosely, the rosette will be larger. Once the flower is almost completely rolled, use a little double stick tape to keep it together—double stick tape is great because you can remove the tape if you need to adjust the flower, and then just stick it back on. Finish the rosette by sticking the last bit of the swirl (the round center) to the tape. This helps the rosette stay together and keep its shape.
- Optional:
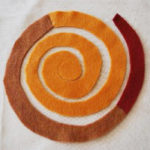
To make multicolored rosettes like the one below, attach two or three different colors of felt together with hot glue to complete a swirl. Then roll it up, just like in step 2. - Make as many or as few rosettes as you’d like. Then arrange them on the grapevine wreath, and secure with hot glue. You can decorate the entire wreath with the flowers or use other fall decorations—I used five sprigs of fall berries and just wove them right into the wreath!
Click here for another fall wreath project by Jacki Hill at craftingmom.com.


