New Year’s Babies

Joseph Christian Leyendecker wasn’t the first artist to use an infant to represent the new year. But over the span of 36 years, he made the New Year’s baby as familiar to Americans as Father Time.

A consummate illustrator — and mentor to Norman Rockwell — Leyendecker was continually searching for better ways to depict the holidays. He created many fanciful covers that caught the spirit of Christmas, Fourth of July, Easter, and Thanksgiving. But the New Year’s babies are arguably his most memorable.

The 1900s

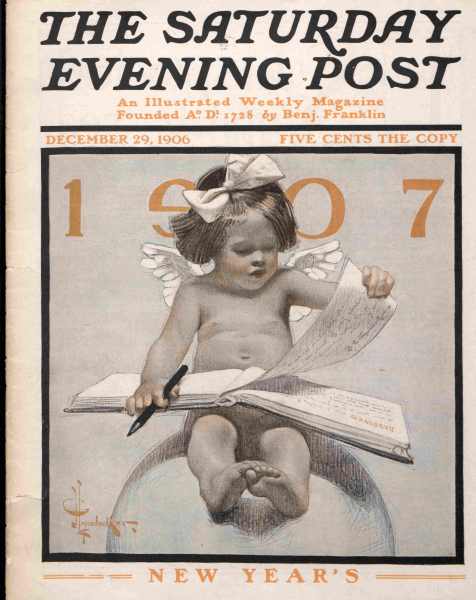
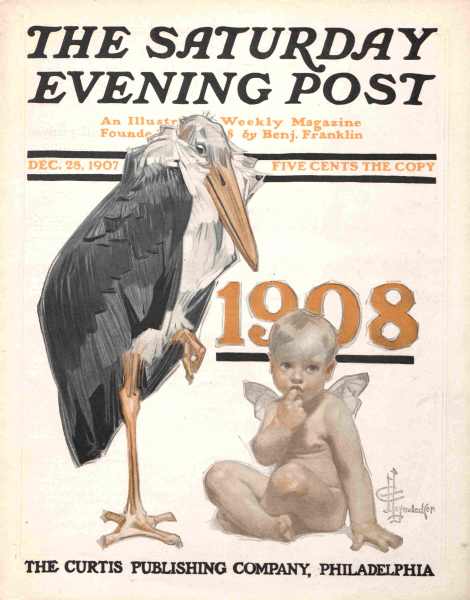
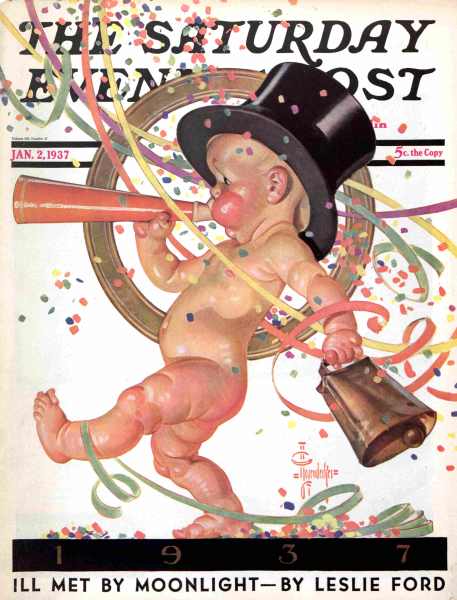
His first baby was delivered for the December 29, 1906, issue of the Post. It shows a cherub atop a globe, turning over a fresh page in a book of New Year’s resolutions. The series continue without interruption until 1943.

Not only do the New Year’s covers showcase Leyendecker’s unmistakably realistic style, but each one insightfully captures the spirit of the times.

Look closely and you’ll notice that Leyendecker painted a baby in some years and a cherub in others. There doesn’t appear to be any logic to Leyendecker’s annual choice – except that, for some covers, his design sense required the figure to have wings.

1900s – Click cover to see larger image.
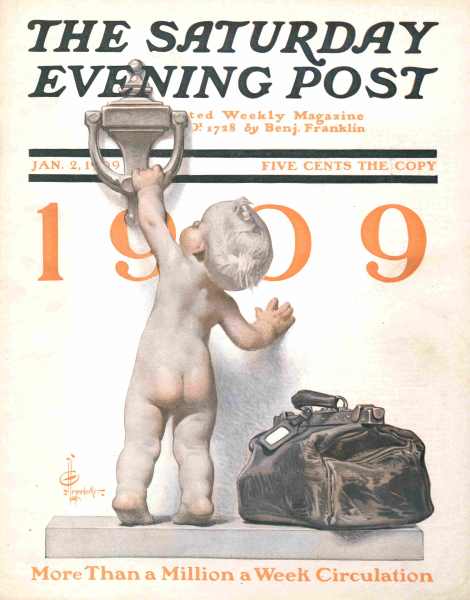
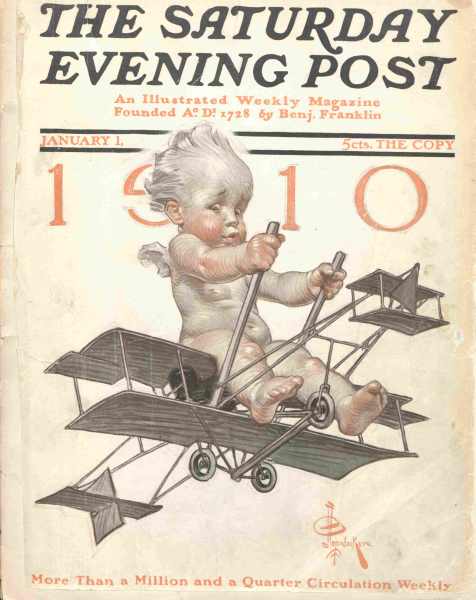
The 1910s

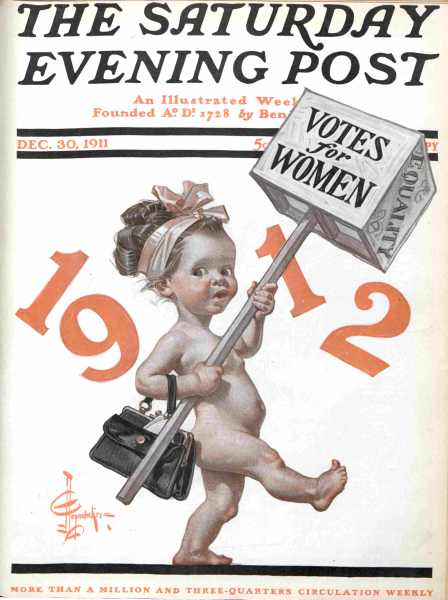
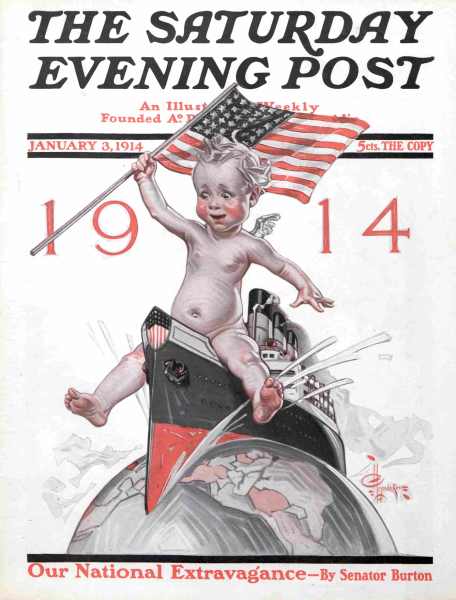
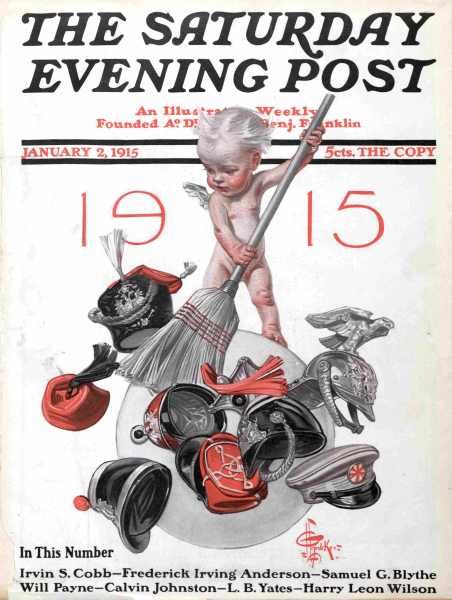
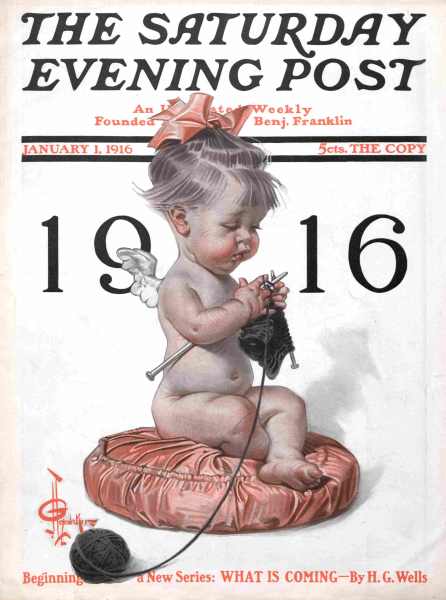
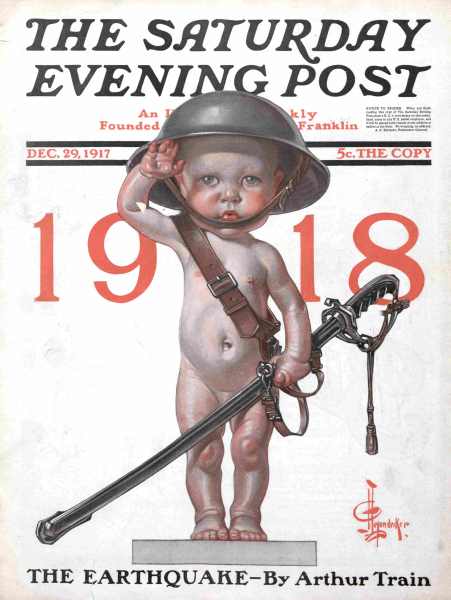
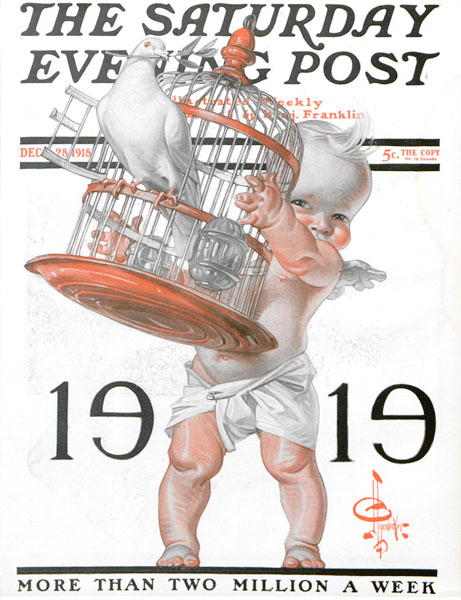
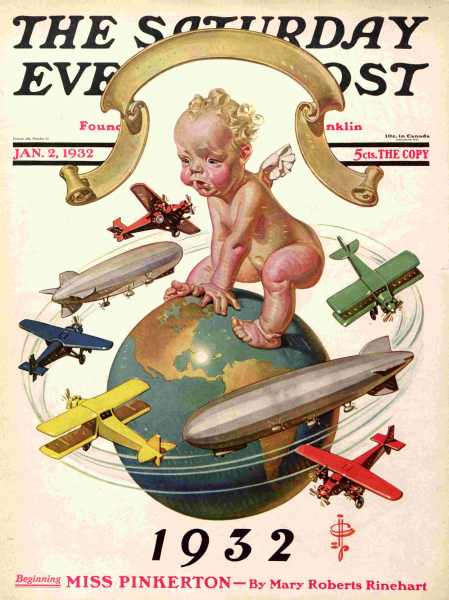
Starting in 1910, Leyendecker’s New Year covers began incorporating contemporary events. The 1910 cherub reflects America’s growing fascination with air travel and anticipates the country’s first airshow in Los Angeles. The 1912 baby takes up the cause for women’s suffrage. A flag-waving 1914 cherub celebrates the completion of America’s canal across Panama, which would open that August. The 1915 cherub tries to sweep the globe clean of the armies at war in Europe, represented by the military caps and helmets of the combatants. The 1917 cherub fretfully regards the explosive events in western Europe just three months before the U.S. enters World War I. A baby was seen reporting for duty in 1918, but in 1919, a cherub appeared, six weeks after the end of fighting, bearing the dove of peace.

The 1910s – Click cover to see larger image.
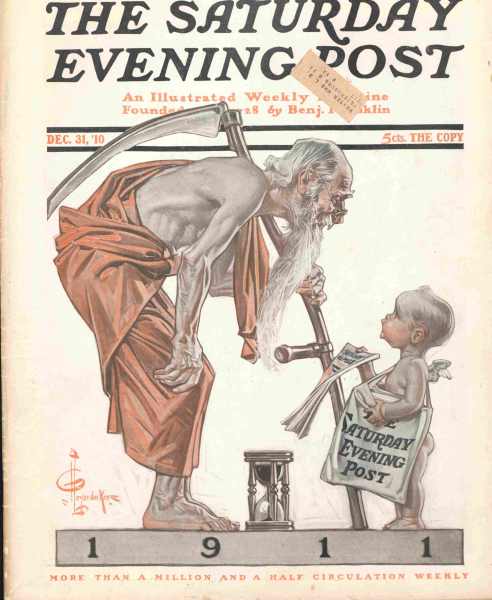
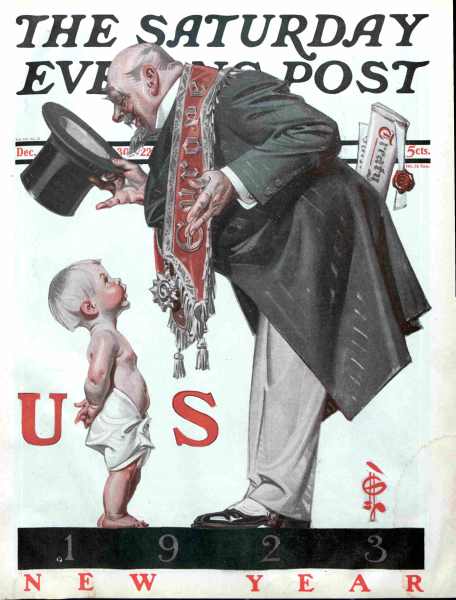
The 1920s

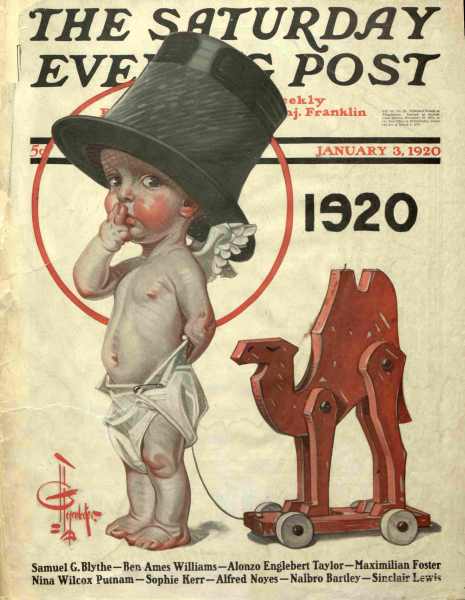
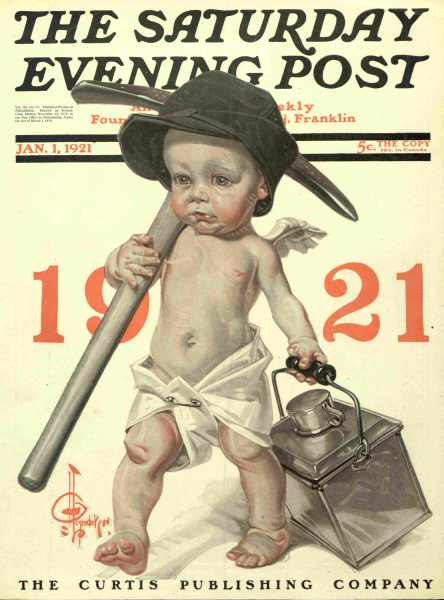
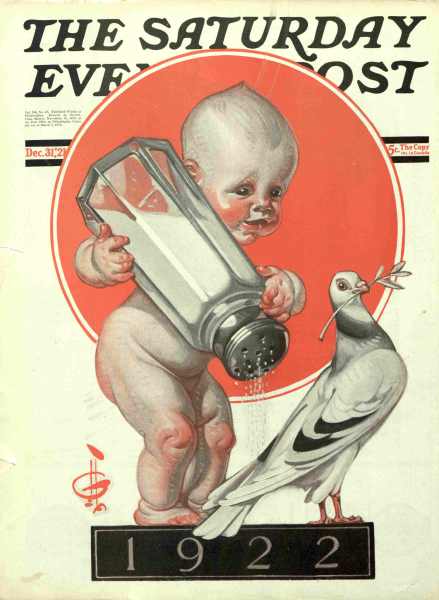
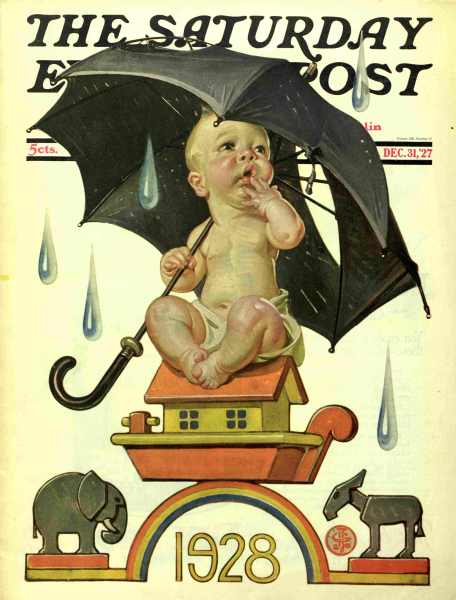
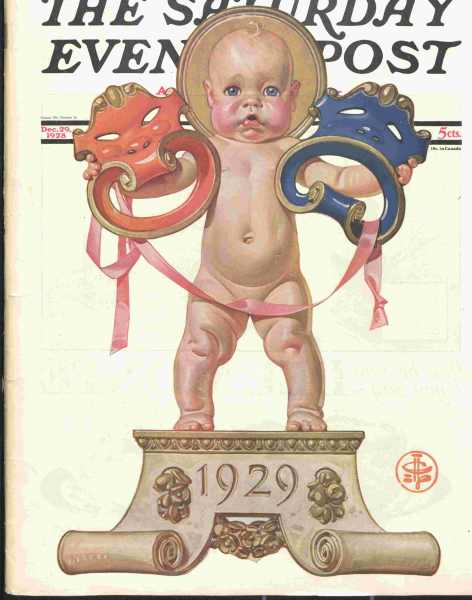
The ’20s saw the start of Prohibition, so Leyendecker’s first cherub of the decade wears a top hat – a reference to the well-known Prohibition cartoon character Mr. Dry – and carries a camel pull-toy symbolizing the long dry spell ahead for America. The 1921 cherub anticipates an end to the bitter coal miners’ strike in Alabama. The New Year’s baby trying to capture a dove – the symbol of peace – by salting it’s tail in 1922, is hoping for the Washington Naval Conference to reduce naval armaments among nine nations. The 1926 cherub anticipates the new Revenue Act, which reduced inheritance and income taxes. Sitting on the ark, the 1928 baby awaits the possible repeal of Prohibition, symbolized by “wet” weather. During a teetering economy in 1929, the New Year’s baby holds theatrical masks, uncertain of whether the coming year will be comic or tragic.

The 1920s – Click cover to see larger image.

The 1930s

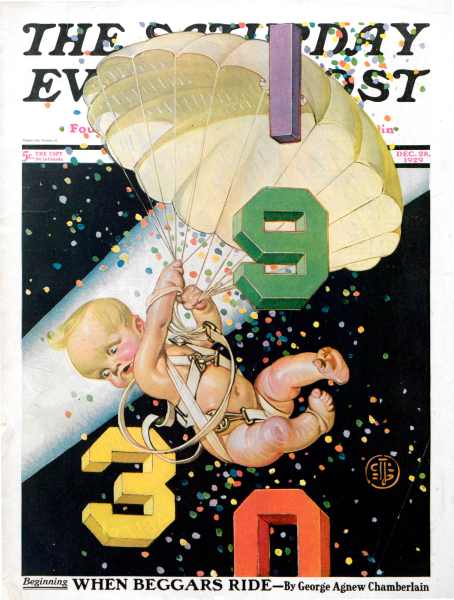
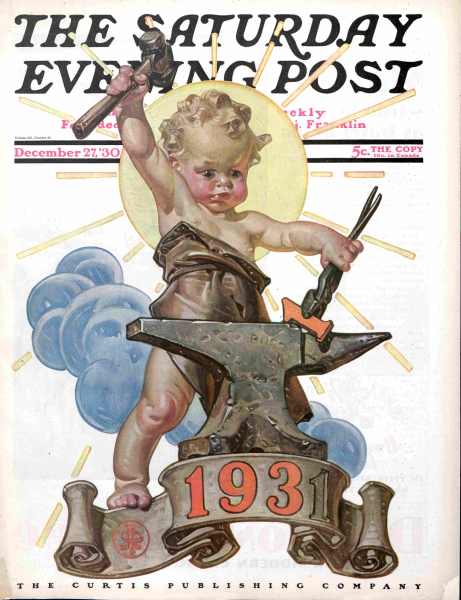
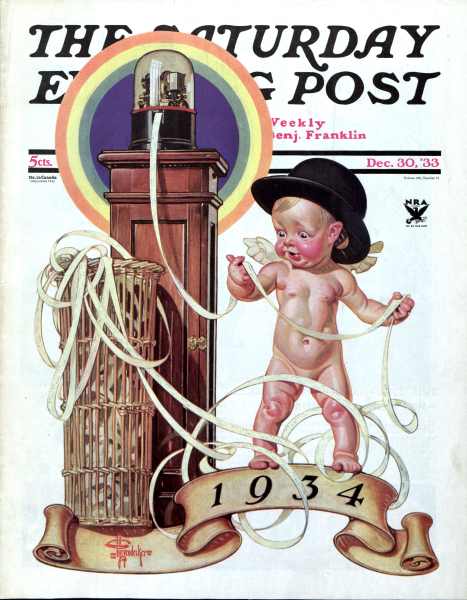
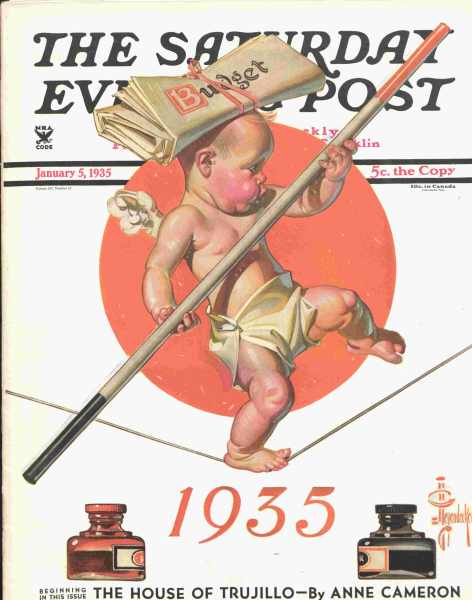
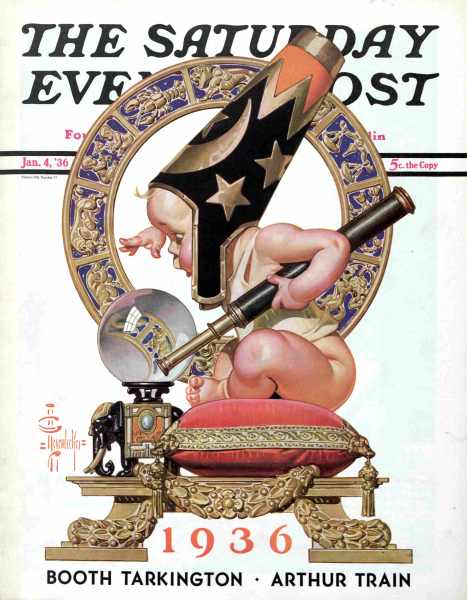
Arriving just two months after the collapse of the stock market in 1930, the baby worried how he’d land in the new year. In 1933, he was recording a desired rise in stock prices. Wearing a businessman’s bowler hat in 1934, he nervously watched a growing pile of stock ticker tape, while the blue eagle of the National Recovery Act hovered over his shoulder. The cherub set out to negotiate 1935 on a fiscal tightrope, between the red ink of debt and the black ink of profit, while precariously balancing a budget on his head. No longer trying to work the numbers in 1936, the baby was looking for the return to prosperity in his crystal ball. Finally, in 1937, when America’s leading economic indicators were approaching late-1920s levels, the New Year’s baby allowed himself a little celebration. By 1938, he had returned, deep in thought, to the anvil he had been pounding in 1931.

The 1930s – Click cover to see larger image.
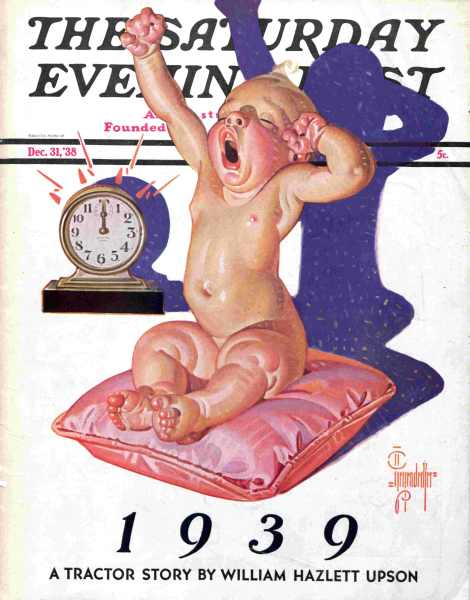
The 1940s

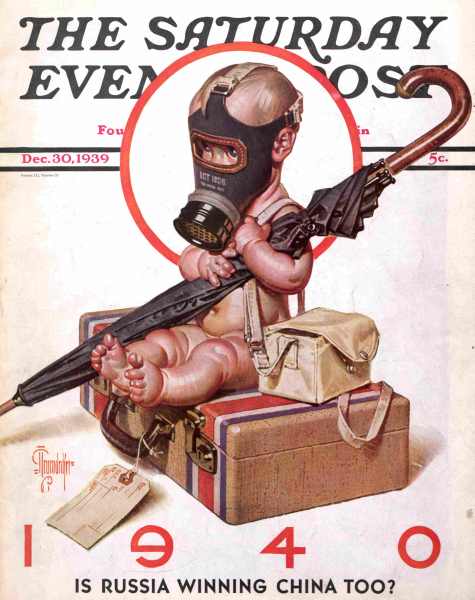
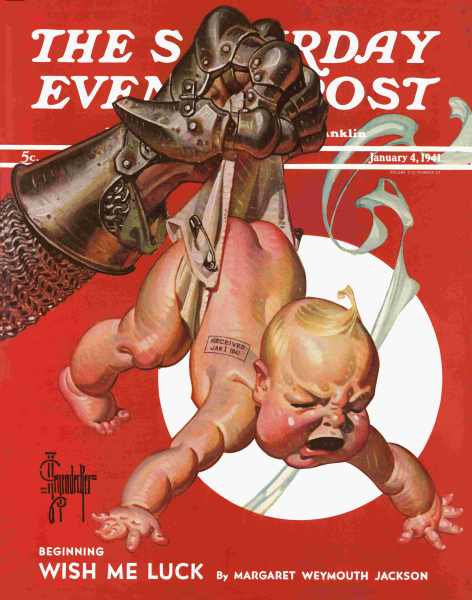
Although the country was at peace in 1940, Americans were growing worried that they would again be dragged into Europe’s conflict. The New Year’s baby was taking no chances. He arrived with his belongings packed, ready to move at a moment’s notice. Meanwhile, he wore his gas mask and clutched an umbrella, a symbolic reference to British Prime Minister Neville Chamberlain whose assurances of “peace in our time” proved illusory. The 1941 baby was delivered by the armored fist of war.

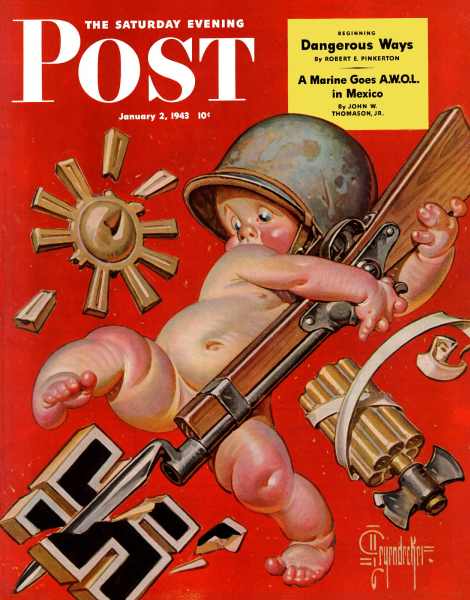
The New Year’s baby of 1942 had probably been painted before Leyendecker heard of the Japanese attack on Pearl Harbor on December 7; the cover shows a wary New Year’s baby wearing a U.S. Army garrison cap and guarding the Western Hemisphere from the spread of European and Asian wars. By 1943, Leyendecker’s baby had come a long way from his early, innocent days. Awkwardly yet enthusiastically, he tears into the symbols of the Axis powers – the Japanese sun, the German swastika, and the Italian fasces. Unfortunately, Leyendecker didn’t continue his series to bring the New Year’s baby out of the war and into peace again. This was his 324th, and last, Post cover.

1940s – Click cover to see larger image.

Easy-Sew Turkey

Easy-Sew Turkeys

These fabric turkeys will add festive charm to your table, mantel, or bookshelves. You will need basic sewing skills to make these cuties, but don’t worry—it’s not too tough for a novice. They are made from simple patterns—only two—and it’s easy to adjust the size (bigger, smaller, fatter!). So get your sewing machine out, gather up some fall fabric, and let’s make a turkey!

How to Make the Easy-Sew Turkey

Materials

Tools

Directions

  1. Fold muslin in half crosswise, then press. Place turkey body pattern on top of folded muslin, trace pattern on fabric with fold along bottom of body, then cut fabric along trace lines (do not cut fabric along fold).
  2. Sew around edge of muslin with ⅜-inch seam allowance. (You’ll want to use a light color thread—I sewed these seams with a darker thread to make it easier to see in the tutorial.)
  3. Pull about ½-inch bottom of body up and push fold against body so fabric lies flat, making a hexagon. Sew two seams about ¼-inch from each point of hexagon as shown below.
  4. With scissors, cut 1-inch slit in the middle of the body—be sure not to cut too close to the bottom or the rice may spill out when you are filling the turkey. Turn right side out.
  5. Fill bottom half with rice and top with stuffing, then stitch closed. (No need to have a perfect seam; this is where you will attach the tail.)
  6. Trace tail pattern on each felt and fall fabric square and cut. Then layer fall fabric and felt as shown below: fall fabric wrong side up, felt, and fall fabric right side up on top. Pin layers together. Use a running stitch (or another embroidery stitch you like) to join layers. I used DMC floss, but thread can also be used.
  7. Glue tail with craft or hot glue to back of body, covering seam from previous step. Dip toothpick in black paint to create eyes and eyebrows. If you’re nervous about your design, practice on scrap fabric or paper first. Add a dab of red paint for the wattle. I glued small triangles of yellow felt for beaks but paint will also work. Create rosy cheeks with a Q-tip and some makeup blush. Then personalize your turkey with buttons or fabric circles, which can be glued or sewn on.


Beaded Earrings Tutorial

Bring some glamour to your wardrobe by following the tutorial below.

How to Make Beaded Earrings

Beaded Earrings by Pamela Leap

Materials

Tools

Directions

  1. Thread beads and bead caps onto head pin.
  2. Use round nose pliers to press pin down at right angle over top bead, then use end of pliers to make loop and cut off excess pin with wire cutters.
  3. Open hanging loop of ear wire and attach beaded dangle. As you close ear wire loop, add some pressure to push the ends toward each other. Push the ends past each other a tiny bit and back again until they align perfectly (so there is no gap).
  4. Repeat to make second earring.


Earring Giveaway

(GIVEAWAY ENDED NOVEMBER 1, 2012)

TO ENTER

To enter this special giveaway, just answer the following question in the comments section of this post.

What is your favorite thing about fall fashion?

From cozy sweaters to chic scarves, fall fashion is in full swing. What is your favorite trend or accessory?

THE RULES

Only one entry per person. Giveaway ends November 1 at 11 p.m. EST. Winners will be selected at random and announced Friday, November 2.

Decorative Fall Leaf Initial

Decorative Fall Leaf Initial

Happy October!  Fall is here in Raleigh, North Carolina, and I’m looking forward to cooler days.

Last year, my first fall project was the transformation of my moss-covered Hobby Lobby “R.” This craft is a quick and easy way to bring a bit of fall into your own home.

How to Make the Fall Leaf Initial

Materials

Tools

Directions

  1. Cover your work area. Spray letter with mounting spray and arrange leaves to cover. I positioned them so that they overlapped. Once you have them where you want them, spray backs of leaves with permanent adhesive spray.
  2. When your leaves have dried, tie ribbon around the letter and hang it up. I’m still not quite sure what I’m going to do with mine. Right now it’s hanging on an old window over a bookcase in our living room, but I may attach it to a wreath … we’ll see.


Fall Wreath with Felt Rosettes

Fall Wreath with Felt Rosettes

Get into the spirit of fall with this unique, handcrafted wreath in warm autumn colors! The wreath is super easy to make and very inexpensive—I purchased all my materials for under $10!

Fall Wreath with Felt Rosettes

Materials

Tools

Directions

  1. Download and print the Rosette Template. Use the template to cut the “swirl” shapes out of your felt. You can adjust the size of your swirl to create larger or smaller rosettes.
  2. Starting at the edge of the swirl, roll it towards the center. The tighter you roll it up, the smaller the rosette will be; if it is rolled more loosely, the rosette will be larger. Once the flower is almost completely rolled, use a little double stick tape to keep it together—double stick tape is great because you can remove the tape if you need to adjust the flower, and then just stick it back on. Finish the rosette by sticking the last bit of the swirl (the round center) to the tape. This helps the rosette stay together and keep its shape.
  3. Optional:
    To make multicolored rosettes like the one below, attach two or three different colors of felt together with hot glue to complete a swirl. Then roll it up, just like in step 2.
  4. Make as many or as few rosettes as you’d like. Then arrange them on the grapevine wreath, and secure with hot glue. You can decorate the entire wreath with the flowers or use other fall decorations—I used five sprigs of fall berries and just wove them right into the wreath!


Click here for another fall wreath project by Jacki Hill at craftingmom.com.

Personalized Business Card Holder

How to Make a Personalized Business Card Holder

Materials, interior, and exterior view of business card holder

Materials

Business Card Holder by Kym Delmar.
Click image to download the PDF version of Kym Delmar's Business Card Holder tutorial.

Tools

Directions

  1. From Fabric A and Fabric B, cut 1 piece each 4 ¾” x 6″.
    From Fabric C, cut 2 pieces 4 ¾” x 4 ¼”.
  2. Lay Fabric A right side up. Fold Fabric C pieces long edges and wrong sides together and press. Then lay folded Fabric C on top of Fabric A (raw edges along top and bottom short edges of Fabric A). Lay Fabric B, wrong side up, on top of Fabric C. Lay interfacing on top of Fabric B. Then pin layers. Use chalk or pins to mark top edge of pockets on interfacing as a guide (the marks indicate where to start and stop stitching).
  3. Using a ¼-inch seam, begin stitching at chalk mark. Stitch along the edge. Finish at second mark. Leave opening for turning. Backstitch at beginning and end of stitching. Also, sew a stitch or two diagonally across corners to prevent “dog ears” on your finished product.
  4. Trim corners.
  5. Finger press seam allowance down on both sides of opening. This will make turning the seam allowance to the inside easier.
  6. Turn right side out.
  7. At this point, you have the option of using either side as the outside of your business card holder.

    Decide which side you want on the outside, then turn pockets to the inside.
  8. Carefully poke out corners. Turn edges of opening inside. Press on both sides of the holder.
  9. Starting at opening, stitch along the edge.
  10. If you like, you can embellish the cover with buttons or fabric flowers.

Enjoy your new business card holder!

This is an original pattern and is for personal use only. Do not sell or redistribute this pattern in any form. Selling the completed items made from this pattern is not permitted without written permission from Kym Delmar. You may contact Kym at [email protected] with questions.

Upcycled Display Stands

Close-up Upcycled Display Stand by Martha Latta. Photo by Martha Latta.

I sell much of my jewelry at stores all around the country, and some stores require a display be provided with the product. I wanted a sort of funky, yet vintage look. So I decided to create my displays from old cups and saucers. The total cost of the entire display was under $10, and it looks fantastic. Take a look below for the materials list and full instructions as well as the finished product!

How to Make Upcycled Display Stands from Old Cups and Saucers

Materials

Tools

Directions

  1. To start, you will want to go to your local thrift store, and pick out a selection of plates, saucers, cups, and vases. Take the time to stack them on top of each other in different ways, to determine height and size of each piece. You also want to make sure the pieces fit together and won’t be top heavy. I purchased 8 saucers and 8 different cups for less than $5 at my local Value Village (secondhand store). Once you get them home, wash them well, and remove any price tags or grease pencil marks. Then allow them to dry completely.
  2. When everything is dry, it is time to start gluing the pieces together. Again, remember to make sure none are top heavy and that the bottoms of the plates and the glassware fit together well. To glue my plates and glasses together, I used a glue called Weldbond. You can find it at most hardware stores. (To be honest, if I make more of these, I would use E-6000 because I found out the the dry time on the Weldbond is 24+ hours and so that made my project take longer!) With Weldbond, you need to put a coat of glue on both pieces of the display stand and let it sit for about 5 minutes BEFORE you press the two pieces together.
  3. The more glue you use, the longer it will take it to dry, but a soft bond is formed after about 5-6 hours. It will be totally dry after 24-36 hours depending on how much glue you used. Putting glue on both pieces first and letting them sit a minute creates a stronger bond.
  4. (I hope you have another project to work on—of course you do!—because it is going to be a whole 24-36 hours before the Weldbond dries. Set the pieces in a place where they won’t have to be moved, so the seal isn’t interrupted during the dry time. Be patient and don’t rush it. When the Weldbond is clear, then it is dry and you can move on to the next step.)

  5. Now that the glue is dry, it’s time to take your stands outside and set them in a flat place with some cardboard below to protect your grass/driveway/patio from the spray paint. The fun part is about to begin!
  6. Using short, small bursts, cover the display stands with a thin coat of paint. Don’t hold the spray nozzle down for an extended period of time or the paint will begin to run and drip. A thin coat will probably not cover any designs on the plates or cups, so plan to put 2-3 coats of paint on them. Also remember that you need to get both sides (top and bottom) of the displays, so you will have to flip them over. Be sure to let the coats dry or you will have fingerprints in the paint!
  7. Once your displays are dry to the touch, move them back inside (I hope I didn’t need to say this before, but don’t spray paint inside!) and let them sit for about 24 hours so that the tackiness goes away and the smell of the paint goes away. Once you have totally dry displays, you are ready to set them up and show off your product!


Upcycled Display Stands by Martha Latta
Martha Latta’s displays are set up at Hip and Handmade in the Enroute Spa at the Indianapolis International Airport. Martha is author of the e-book, The Blogging Adventure: Tips & Prompts for a Crafter by a Crafter, and offers an e-course titled “30 Day Blogging for Crafters.” To purchase Martha’s e-course, e-book, or her handmade goods visit SundayAfternoonHousewife.com.

Solar Print Craft

Solar Print Lampshade Craft
Kindergarten-inspired elegance.

I fell in love with cyanotypes while on a kindergarten field trip. After hanging up our coats, they led us into a large room in the forefront of the John Michael Kohler Arts Center, stocked with tables, chairs, and enough art supplies to make Grayson Perry salivate.

We each were seated in front of three large sheets of blue paper. The art director explained that the sheets would turn white in the sun, and any part kept in shadow would turn blue.

Here’s a DIY project that will help light up your home.

Decoupage Solar Print Lampshade

Materials

Tools

Directions

  1. Lay cardboard down, then paper, then naturals on top. (Because ultraviolet light causes the reaction in the paper, do this in a dark room away from the sun.) If it’s a windy day, lay a piece of clear acrylic, plastic wrap, or glass on top to keep design from shifting.
  2. Set in sun. Exposed areas of paper will begin to fade from blue to white. Depending on how many clouds are in the sky, this process could be done in minutes or hours.
  3. When the areas of uncovered paper have turned completely white, submerge in water. For a deep Prussian blue, let paper soak for at least 5 minutes. Hang sheets to dry.
  4. After paper has completely dried, place between two sheets of parchment paper and iron. Then plot design layout on shade. (I taped—and re-taped—the sheets to the lampshade until I found an arrangement I liked.) Then, trim edges of paper to fit.
  5. Pour glue into bucket and dilute with water. (Equal parts water and glue.) Remove tape and use paintbrush to glue paper to shade. When dry, paint a layer of decoupage glue over entire surface of lampshade. Attach shade to lamp when dry.
  6. Solar print Lampshade Craft


Quilt a Birthday Place Mat

It’s Your Birthday Place Mat

This whimsical mat can be made with any fabric you choose. For a personal touch, make one for each family member in their favorite colors. Use cotton fabrics and batting and your place mat is machine washable.

It's Your Birthday Place Mat. Photo by Kym Delmar.

It's Your Birthday Place Mat Tutorial by Kym Delmar.
Click image to download a PDF of “It's Your Birthday Place Mat Tutorial” by Kym Delmar

Materials

Tools

Directions

  1. Cut 4 ½” squares from four patterned cotton fabrics.
  2. Cut 5” piece of wide rickrack for each square.
  3. Cut 2 ½” x width of fabric (WOF) strip of solid cotton to use as borders for your package squares.
  4. With right sides together, sandwich rickrack between the solid strip and the patterned square, lining up top and left edge as shown.
  5. Stitch with ¼” seam.
  6. Press seam flat from wrong side, then open gently with iron pressing seam toward strip.
  7. Trim excess solid strip even with square.
  8. Add another solid strip to the right side of square. Then stitch and press open as in Steps 5 and 6. Trim solid strip even with square as in Step 7.
  9. Repeat for all four sides of square.
  10. Using 6 ½” square ruler or template made from wax paper, center square at an angle. Check all four corners to make sure that they are not being cut off. Cut around all four edges with rotary cutter.
  11. Cut 7” piece of narrow rickrack. Add fray check to each end.
  12. Make two loops in narrow rickrack to form a bow shape (don’t really tie into a bow because it is too bulky). Stitch in place at top of package, above wide rickrack.
  13. Make three more packages in the same way. IMPORTANT NOTE: On two of the packages, when you cut the square, tilt ruler in the opposite direction as shown.
  14. Lay four package blocks as shown.
  15. Flip rows right sides together and chain sew along right seam. Leave thread between rows intact.
  16. Press sewn seams in opposite directions so that row seam will lock together.
  17. Use a straight stitch down the center of rickrack to secure each package.
  18. From leftover scraps of solid cottons, cut a strip of each fabric around the same length. Widths can vary.
  19. Stitch these strips right sides together along long edges. I used a serger for speed, but a regular stitch would work fine. Press seams to one side.
  20. Cross cut joined strips into 2” segments. Join enough of these segments along their short edges to cover bottom and top of tilted package section. Sew strip to top and bottom. Press seams toward packages.
  21. Next, cut two solid pieces, 2” by 15” each. Stitch them to sides of place mat, press toward solid.
  22. This is what the place mat looks like so far.
  23. Cut one solid piece 8” x 4.75” for cake, two patterned strips 8” x 1.25” for side background pieces, one patterned piece 6.25” x 4.25” for top background, and one patterned piece 6.25” x 3.5” for cake base. Also cut a strip of wide rickrack 5” long.
  24. Place rickrack about 1 ½” down from top of solid cake piece. With right sides together, stitch side background pieces to either side of solid cake piece, enclosing ends of rickrack in seam. With right sides together, stitch cake base piece to bottom of cake and side piece unit.
  25. With right sides together, stitch cake base piece to bottom of cake and side piece unit.
  26. Cut a rectangle of yellow solid for flame, approximately 3” x 6”.
  27. Fold short ends to middle, and then fold in half. You will be cutting through four layers of fabric. Cut flame shape as shown. Stitch both flames together close to the edge, all the way around flame shape. Clip middle of one side with scissors, and turn right side out. Poke out edges and press.
  28. Cut a 2” x 1” rectangle.
  29. Fold long sides to middle. Lay out on background to check position, then sandwich between top background and cake piece right sides together and stitch. Press up, position flame on top, and topstitch around flame and candle to secure to background.
  30. Sew cake section to rest of place mat.
  31. Layer in the following order: batting, then backing and top right sides together. Stitch around place mat with a ½” seam, leaving an opening for turning. To avoid “dog ears,” take a stitch or two at an angle across each corner as shown.Trim seam and clip corners. Turn right side out.
  32. Quilt as desired. I quilted in the ditch around the cake and present shapes, and did free motion quilting everywhere else. I’ve included some pictures of the front and back so that you can see the quilting.
  33. It's Your Birthday Place Mat. Photo by Kym Delmar.

    It's Your Birthday Place Mat (back). Photo by Kym Delmar.

This is an original pattern and is for personal use only. Do not sell or redistribute this pattern in any form. Selling the completed items made from this pattern is not permitted, without written permission from Kym Delmar. You may contact Kym at [email protected] with any questions.