Curtis Stone’s Oven-Roasted Baby Beets with Orange Vinaigrette
The earthiness of beets provides a nice counterbalance or alternative to a traditional, sweet cranberry sauce, and the vinaigrette with orange brightens up the dish. The beets can be roasted and the vinaigrette prepared ahead so that you can pull together all the components once you pull your turkey out of the oven.
Oven Roasted Baby Beets with Orange Vinaigrette
(Makes 4 servings)
- 2 bunches baby red beets, scrubbed, stems trimmed
- 2 fresh thyme sprigs
- 2 garlic cloves, finely chopped
- 1 shallot, cut in half
- 1 tablespoon extra-virgin olive oil
- 1 tablespoon water
- 2 cups (not packed) baby arugula
Vinaigrette:
- 2 oranges
- 1 tablespoon balsamic vinegar
- 1 tablespoon finely chopped shallot
- 1 teaspoon Dijon mustard
- 2 tablespoons extra-virgin olive oil
Instructions
To roast beets: Preheat the oven to 400°F. Place beets, thyme, garlic, and shallot in center of large piece of aluminum foil, then fold up sides of foil to form pouch, leaving open at top. Pour oil and water over the beets and season with salt and pepper. Roast beets for 25 to 30 minutes, or until small paring knife can be inserted into center of a beet with no resistance. Set aside to cool slightly.
To make vinaigrette: Into medium bowl, finely grate orange zest from 1 orange. Cut off tops and bottoms of 2 oranges. Using small sharp knife, cut away peel and white pith from oranges, following curve of oranges from top to bottom. Holding 1 orange in your hand and working over bowl, make 2 cuts along membranes on either side of segment, then lift segment out of membranes and drop it into bowl. Repeat to remove all segments from both oranges, and set segments aside. Squeeze membranes over bowl of orange zest to release 1 tablespoon of juice.
Whisk vinegar, shallot, and Dijon into bowl of orange zest and juice. Slowly add oil while whisking to blend completely. Season vinaigrette to taste with salt and pepper.
To serve: Quarter beets and arrange them on center of platter with orange segments. Sprinkle arugula over. Drizzle vinaigrette over and serve.
Make-Ahead: The beets can be roasted and vinaigrette and orange segments prepared up to 8 hours ahead, covered separately and refrigerated. Let beets and vinaigrette stand at room temperature for 20 minutes and rewhisk vinaigrette before serving.
Per serving
- Calories: 196
- Total Fat: 10 g
- Saturated Fat: 1 g
- Sodium: 79 mg
- Carbohydrate: 22 g
- Fiber: 5 g
- Protein: 2 g
- Diabetic Exchanges: 0.5 fruit, 2.5 vegetable, 2 fat
Credit: Recipe © Curtis Stone; photo by Ray Kachatorian
Curtis Stone’s Bird to the Wise
Sitting down with family and friends with a meal you prepared is one of the simplest and greatest gifts you can give someone.
As a busy parent and chef, I know that balancing work and home life is no easy task. Despite the challenges, it’s still possible to serve budget-friendly, hassle-free, and healthy home-cooked meals.
America’s go-to protein, chicken is a dinnertime staple, but if you’re tired of serving the same recipes week after week, it’s time to switch up your bird game.
Look at a whole chicken as a blank canvas. You can keep a recipe basic or ramp it up with spicy heat, herbaceous flavors, and, as always, seasonal vegetables.
The beauty of the Roasted Butterflied Chicken and Tomatillos recipe is how flavors mix and mingle during cooking. As the tomatillos roast, they soften into a mouthwatering chunky salsa verde and are seasoned with the chicken’s juices. While the recipe calls for tortillas, you can spoon it over rice, polenta, or mashed potatoes.
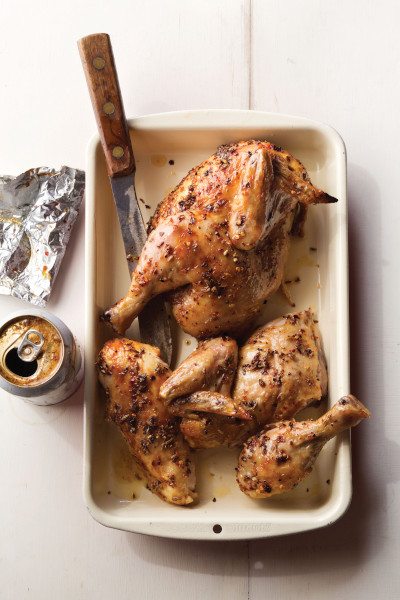
Steam from the brew in Beer Can Chicken with Tomato Toast keeps the meat moist and juicy, and the can props the chicken up, so it roasts evenly. The garlic, fennel seeds, crushed red pepper flakes, thyme, and tomatoes add a distinctive herbaceous flavor to the meat, but I encourage you to come up with your own combinations.
Roasted Butterflied Chicken and Tomatillos
(Makes 6 servings)
- 1 4-pound whole chicken
- 4 teaspoons olive oil
- 2 teaspoons sweet paprika
- 1 teaspoon ground cumin
- 1 1/2 pounds tomatillos, husked, rinsed, and cut in half
- 1 white onion, halved and cut into ½-inch-thick wedges
- 3 garlic cloves, finely chopped
- 1 jalapeño pepper, seeded and finely chopped (for a hotter sauce, keep the seeds)
- 1/4 cup coarsely chopped fresh cilantro
- 1 lime, cut into wedges, for serving
- 6 whole-wheat flour or corn tortillas, warmed, for serving
Preheat the oven to 400°F. Using poultry shears, split chicken open by cutting down one side of backbone, then cut out and remove backbone. Place chicken skin-side up on chopping board. Put your hand on breastbone and press hard to flatten chicken.
Heat very large cast-iron or other heavy ovenproof skillet over medium-high heat. Meanwhile, in small bowl, mix 2 teaspoons of olive oil with paprika, cumin, and 1 teaspoon pepper. Season with salt. Rub mixture all over chicken. Place chicken skin-side down in hot skillet and cook for about 4 minutes, or just until skin side is golden brown. Transfer chicken to large plate. Set skillet aside.
In large bowl, toss tomatillos, onions, garlic, and jalapeños with remaining 2 teaspoons olive oil. Season with salt and pepper. Arrange half of tomatillo mixture in skillet and nestle chicken on top, skin side up. Scatter remaining mixture around the chicken. Move skillet to oven. Roast for about 45 minutes, or until chicken shows no sign of pink when pierced in thickest part with tip of small, sharp knife and tomatillos are falling apart into sauce. Remove from oven and let stand for 10 minutes.
Season tomatillo salsa to taste with salt. Sprinkle cilantro over chicken and salsa and serve with lime wedges and tortillas.
Per serving
- Calories: 532; Total Fat: 29 g
- Saturated Fat: 8 g; Sodium: 251 mg
- Carbohydrate: 34 g; Fiber: 6 g; Protein: 34 g
- Diabetic Exchanges: 1.5 starch, 4 lean meat, 2 vegetable, 3.5 fat
Beer Can Chicken with Tomato Toast
(Makes 6 servings)
- 2 tablespoons extra-virgin olive oil, divided, plus more for drizzling
- 4 garlic cloves, divided; 2 finely chopped, 2 whole
- 2 teaspoons fennel seed, coarsely crushed
- 1 teaspoon crushed red pepper flakes
- 1 4-pound whole chicken, patted dry
- 1 12-ounce can of beer
- 6 3/4-inch-thick slices baguette
- 4 tomatoes, halved crosswise
- 1 teaspoon fresh thyme leaves
Mix 1 tablespoon oil, chopped garlic, fennel seed, pepper flakes, and 1 teaspoon pepper in small bowl. Season to taste with salt. Rub mixture all over chicken. Cover and refrigerate for at least 1 hour and up to 1 day.
Prepare covered grill for indirect heat: Preheat all burners over high heat for 20 minutes. Turn off middle burner(s) and keep both side burners on high heat. Temperature gauge should read between 375°F and 400°F.
Pour off (or drink!) half of beer. Wrap aluminum foil around sides of beer can and place on heavy baking sheet. Carefully position chicken over beer can so it steadily rests upright on top of can. Place baking sheet over unlit portion of grill. Cover grill.
Cook chicken, rotating 180° halfway through cooking, for about 1 hour, or until chicken skin is golden brown and crisp, juices run clear, and a meat thermometer inserted into thickest part of thigh registers 165°F.
Using tongs, transfer chicken and can to cutting board. Remove can from chicken. Rest chicken, breast side up, on board 10 minutes.
Meanwhile, grill bread over lit burners for 2 to 3 minutes per side, or until toasted and lightly charred. Rub whole garlic cloves over toast. Rub halved tomatoes over 1 side of toast until tomato flesh is covering them (use 1 tomato half for 2 slices of toast); discard tomato skins. Drizzle tomato toast with 1 tablespoon oil and sprinkle with salt.
Carve chicken and place on platter with toast. Sprinkle with thyme and serve.
Make-Ahead: Chicken can marinate in spice mixture up to 1 day, covered and refrigerated.
Per serving
- Calories: 700; Total Fat: 29 g; Saturated Fat: 7 g; Sodium: 804 mg
- Carbohydrate: 47 g; Fiber: 1 g; Protein: 40 g
- Diabetic Exchanges: 2.5 starch, 4 lean meat, 1 vegetable, 4 fat
Want more chicken recipes? Check out Curtis Stone’s Simple Roast Chicken and Potatoes at saturdayeveningpost.com/roastchicken.
This article is featured in the September/October 2020 issue of The Saturday Evening Post. Subscribe to the magazine for more art, inspiring stories, fiction, humor, and features from our archives.
From What’s for Dinner? by Curtis Stone. Copyright © 2013 by Curtis Stone. Excerpted by permission of Ballantine Books, a division of Random House LLC. All rights reserved.
Recipes © Curtis Stone
Featured image: Roasted Butterflied Chicken and Tomatillos (Quentin Bacon)
Curtis Stone’s Simple Roast Chicken and Potatoes
This mouthwatering bird is a classic, and every family has their favorite version. Well here’s mine, which is made with just a few ingredients but has served my family and me very well over the years. Follow this recipe for a golden bird with juicy meat and some of the tastiest potatoes you could hope for. Stick with small Yukons — they are the perfect size, and their waxy skins become nice and crunchy.
Simple Roast Chicken and Potatoes
(Makes 6 servings)
- One 4-pound whole chicken, legs tied together
- 1 ½ tablespoons grapeseed oil
- 12 small Yukon gold potatoes (about 6 ounces each), halved
- 1 tablespoon all-purpose flour
- ¾ cup reduced-sodium chicken broth
Instructions
Position rack in center of oven and preheat oven to 425°F.
Place chicken on large heavy rimmed baking sheet. Rub ½ tablespoon of oil all over chicken and season with salt and pepper. In medium bowl, toss potatoes with remaining 1 tablespoon oil to coat. Season potatoes with salt and pepper and place them around chicken.
Roast for 55 minutes, or until thickest part of chicken thighs reach 160°F and the juices run clear when pierced and potatoes are tender but crisp on outside. Transfer chicken and potatoes to platter and let rest for 10 minutes before serving.
Meanwhile, pour pan drippings into small liquid measuring cup. Spoon off fat from drippings, reserving 1 tablespoon of fat. In small heavy saucepan, heat reserved fat over medium-high heat. Whisk in flour. Continue whisking for about 1 minute to cook flour. Whisk in pan drippings, broth, and any juices that have accumulated on platter. Simmer, whisking, for about 2 minutes, or until gravy thickens slightly. Season to taste with salt and pepper. Serve chicken and potatoes immediately with gravy.
Leftover chicken can be stored airtight in the refrigerator for up to two days and used for sandwiches, salads, or soups.
Per serving
- Calories: 586
- Total Fat: 26 g
- Saturated Fat: 7 g
- Sodium: 273 mg
- Carbohydrate: 56 g
- Fiber: 6 g
- Protein: 35 g
- Diabetic Exchanges: 4 starch, 4 lean meat, 4 fat
This article is featured in the September/October 2020 issue of The Saturday Evening Post. Subscribe to the magazine for more art, inspiring stories, fiction, humor, and features from our archives.
Credit: Photo by Ray Kachatorian. Excerpted from Good Food, Good Life by Curtis Stone. Copyright © 2015 by Curtis Stone. Excerpted by permission of Ballantine Books, a division of Random House LLC. All rights reserved.
Smart Summer Grilling with Curtis Stone
Nothing says summer quite like firing up the grill and dining outside — it’s something I wait all year to do! To pull off fun-filled, hassle-free outdoor dinner, my mantra has always been to get as much done as you can in advance. Get the grill ready so it can become your outdoor cooktop all summer long. Set the outdoor table, prepare the BBQ sauce, and then form the burger patties and place them in the fridge until you’re ready to grill. Keep the menu simple and healthy. Swap out ground beef with ground turkey — a lighter, leaner option — as in BBQ Turkey Burgers with Homemade Pickles. Before popping patties on the grill, make a ¼-inch depression in the center of each burger to trap in flavor and prevent grill bulge. Instead of store-bought condiments, make your own, allowing you to control what’s in them. The ingredients in my barbeque sauce form my ideal balance of salty, spicy, sweet, and acidity and complement the savory, meaty flavors of turkey. Top burgers with homemade pickles that are super easy to make and require no special equipment other than a jar.
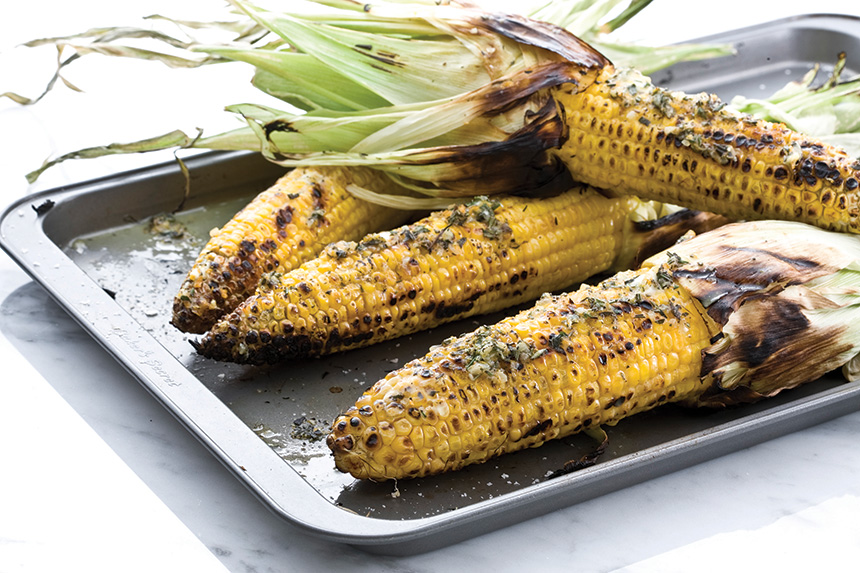
And no barbeque is complete without sweet corn. I added a few ingredients to Grilled Corn on the Cob with Parsley and Garlic Brown Butter that take it to another level.
If it’s still not safe for friends to come over, stay connected by sharing photos on social media.
BBQ Turkey Burgers with Homemade Pickles
(Makes 4 servings)
Pickles:
- 1/2 English cucumber, thinly sliced
- 3/4 cup apple cider vinegar
- 1 tablespoon granulated sugar
- 1/4 teaspoon crushed red pepper flakes (optional)
- 2 garlic cloves, smashed
- 1 cup water
- 2 teaspoons kosher salt
- 1/2 teaspoon pepper
Barbecue Sauce:
- 1/4 cup wood chips (such as hickory)
- 1/2 cup ketchup
- 2 tablespoons Dijon mustard
- 2 tablespoons light brown sugar
- 2 tablespoons molasses
- 2 tablespoons reduced sodium Worcestershire sauce
- 1 tablespoon apple cider vinegar
- 1 tablespoon unsalted butter
- 1 chipotle chile in adobo, finely chopped
Burgers:
- 1 1/2 pounds ground turkey (85% lean) (24 ounces)
- 1 tablespoon olive oil
- 4 whole-wheat hamburger buns, toasted
- 1/4 white onion, thinly sliced
Directions
To make pickles: Place cucumbers in 1-quart Mason jar or other tall narrow container. In small saucepan over medium-high heat, bring vinegar, sugar, red pepper flakes (if using), garlic, water, kosher salt, and pepper to boil, whisking to dissolve sugar. Pour hot liquid over cucumbers and leave to cool to room temperature. Refrigerate until ready to serve.
To make barbecue sauce: Preheat covered charcoal grill for medium-high heat. Sprinkle wood chips over charcoal. In small ovenproof saucepan, whisk ketchup, mustard, sugar, molasses, Worcestershire, vinegar, butter, and chipotle. Place saucepan on grill, cover grill hood and cook sauce, stirring occasionally, for 5 minutes, or until it has thickened slightly. Season with salt and pepper.
To make burgers: Divide turkey into 4 patties that are slightly larger in diameter than buns. Brush patties with oil and season both sides with salt and pepper. Using your thumb, make a ¼-inch-deep depression in center of each patty. Grill patties 4 minutes. Turn patties over, brush with some barbecue sauce, and grill 4 minutes, or until well browned and cooked through. Transfer burgers to plate to rest 5 minutes. Place burgers on bun bottoms. Spread more barbecue sauce on burgers, if desired, top with pickles, onions, and bun tops, and serve. Save any remaining barbecue sauce for another use.
Make-Ahead: Pickles can be made up to 1 week ahead, covered, and refrigerated. Barbecue sauce can be made up to 3 days ahead, covered, and refrigerated.
Per serving:
- Calories: 670
- Total Fat: 34g
- Saturated Fat: 10g
- Sodium: 910 mg
- Carbohydrate: 57 g
- Fiber: 4 g
- Protein: 30 g
- Diabetic Exchanges: 3.5 carbohydrate, 4 lean meat, 0.5 vegetable, 5 fat
Grilled Corn on the Cob with Parsley and Garlic Brown Butter
(Makes 6 servings)
- 1/4 cup (1/2 stick) butter, room temperature
- 2 garlic cloves, finely chopped
- 2 teaspoons coarsely chopped
- fresh flat leaf parsley
- 1 tablespoon lemon juice
- 6 ears fresh yellow corn with husks attached
To make brown butter: Place small heavy saucepan over medium heat. Add butter and cook for 5 minutes or until butter melts and becomes golden brown, swirling pan occasionally. Remove from heat; stir in garlic. Set aside until butter is almost cold, then add parsley and lemon juice. Place butter mixture in bowl and chill until mixture is cold and firm.
To grill corn: Fold back husks from corn cobs and remove corn silk (keep husks attached to cobs). Soak corn in large bowl of cold water for 1 hour. Drain and pat corn dry. Prepare barbecue for medium heat. Tear a few corn husks into long strips. Gather husks at base of corn cob and tie them with husk strips to secure. Repeat with remaining corn cobs.
Spread garlic butter all over corn kernels and sprinkle with salt and pepper. Place corn on grill. Cover and cook, turning occasionally, for 15 to 20 minutes, or until corn is soft and juicy and husks are lightly charred.
Make-Ahead: The garlic brown butter can be made 2 days ahead, covered, and refrigerated.
Per serving:
- Calories: 158
- Total Fat: 9 g
- Saturated Fat: 5 g
- Sodium: 77 mg
- Carbohydrate: 20 g
- Fiber: 2 g
- Protein: 3.5 g
- Diabetic Exchanges: 1.25 carbohydrate, 1.5 fat
Want more cookout ideas? Check out Curtis Stone’s Grilled Steak Salad at saturdayeveningpost.com/steaksalad.
This article is featured in the July/August 2020 issue of The Saturday Evening Post. Subscribe to the magazine for more art, inspiring stories, fiction, humor, and features from our archives.
Featured image: BBQ turkey burger with homemade pickles (Ray Kachatorian)
Curtis Stone’s Grilled Steak Salad
Grilled Steak Salad
(Makes 4 servings)
- 1 rib eye steak, 12 ounces
- 8 cups arugula (not packed, about 4 oz.)
- 3 tablespoons extra-virgin olive oil
- 2 tablespoons fresh lemon juice
- 1 ounce shaved Parmesan cheese
- 1 bunch asparagus, ends trimmed
- 1 ½ teaspoons olive oil
Instructions
Prepare grill for high heat. Pat steak dry with paper towels and season with salt. Grill steak on hottest part of grill, rotating as needed, for 2-3 minutes per side, or until heavily browned outside and medium-rare inside.
Meanwhile, in a bowl, toss arugula, extra-virgin olive oil, lemon juice, and Parmesan to coat. Season with salt. Transfer salad to a large serving platter. As steak comes off grill, season with pepper, and set aside 5 minutes to rest.
As steak rests, toss asparagus with remaining 1 ½ teaspoon of olive oil and sprinkle with salt and pepper. Grill asparagus, turning as needed, for about 5 minutes, or until charred all over and crisp tender. Transfer to cutting board and cut in half.
On cutting board, slice steak against grain into thin strips and serve over arugula salad and grilled asparagus.
Per serving
- Calories: 382
- Total Fat: 29 grams
- Saturated Fat: 8 grams
- Sodium: 160 mg
- Carbohydrate: 3.5 grams
- Fiber: 1.5 grams
- Protein: 27 grams
- Diabetic Exchanges: 3.5 lean meat, 0.5 vegetables, 4.25 fat
This article is featured in the July/August issue of The Saturday Evening Post. Subscribe to the magazine for more art, inspiring stories, fiction, humor, and features from our archives.
Credit: Photo by Ray Kachatorian; Recipe courtesy Curtis Stone
Curtis Stone’s Spice-Rubbed BBQ Lamb Ribs
(Makes 8 servings)
- 2 teaspoons coriander seeds
- 1 teaspoon fennel seeds
- ¼ teaspoon cumin seeds
- 2 teaspoons smoked paprika
- ¼ teaspoon cayenne pepper
- 1 teaspoon salt
- 2 pounds [2 racks] lamb ribs
- 2 teaspoons olive oil
Yogurt sauce
- ½ cup low-fat Greek-style yogurt
- 2 tablespoons olive oil
- 1 red Fresno chile, seeded, finely chopped
- 2 teaspoons finely chopped flat-leaf parsley
- 1 teaspoon finely chopped tarragon
- ½ teaspoon finely chopped rosemary
- ½ lemon, rind finely grated, juiced
Instructions
Preheat oven to 325°F. Using spice grinder or mortar and pestle, grind coriander, fennel, and cumin to fine powder. Transfer to small bowl with paprika, cayenne pepper, and salt. Stir to combine.
Note: Grinding whole spices gives amazing flavor, but if you don’t have them to hand, simply use ground spices. Reduce the coriander to 1½ teaspoons if using ground. Fennel and cumin quantities remain the same.
Separate ribs and pat dry with paper towel. Brush ribs all over with oil and sprinkle spice mixture evenly over both sides of ribs.
Place ribs on large, heavy, rimmed baking sheet and cover tightly with foil. Bake for 2½ hours or until lamb is tender. Carefully place covered baking sheet on wire rack for 30 minutes to rest.
Meanwhile, to make the yogurt sauce, in small bowl, whisk yogurt, oil, chile, parsley, tarragon, and rosemary with ½ teaspoon lemon rind and 2 teaspoons lemon juice until well combined. Season with salt and freshly ground black pepper.
Prepare barbecue for medium-high heat. Remove lamb ribs from excess fat and pan juices. Grill lamb ribs for 2 minutes each side or until caramelized. Transfer to large serving platter and serve with yogurt sauce.
Make Ahead: Ribs can be rubbed with spice mixture up to one day ahead. Cover and store in fridge. The ribs can also be baked up to one day ahead. Remove baked ribs from excess fat and pan juices and then store in airtight container in fridge. If barbecuing cold baked ribs, cook them over medium heat, turning as needed, for about 12 minutes, or until caramelized and warmed through. The yogurt sauce can be made up to one day ahead; cover and store in the fridge.
Per serving
- Calories: 430
- Total Fat: 35 g
- Saturated Fat: 14 g
- Sodium: 336 mg
- Carbohydrate: 2 g
- Fiber: 0.5 g
- Protein: 26 g
- Diabetic Exchanges: 5 lean protein, 5.5 fat
Note: This was made with lamb rib, roasted, choice, 1/8-inch trim (USDA).
Featured image: Ray Kachatorian
Curtis Stone’s Spring Vegetables
For me, there’s no better transition than the one from winter to spring. I look for peas, asparagus, and strawberries at their flavorful peak, and I showcase them in light, bright-tasting recipes.
Sweet and tender and incredibly versatile, round plump garden peas go with almost anything, and sugar snap peas make a healthy snack when eaten raw with hummus or other dips. Peas are sweetest just after picking and should be eaten right away after harvest.
Freshly picked peas also pair well with seafood, as in my recipe for Seared Scallops and English Peas with Mint. Scallops are the darling of the sea, mildly sweet with a beautifully tender texture. When cooking, get your pan nice and hot before adding scallops to get a nice sear.
I go mad for fresh asparagus. The spring superstar can be roasted, grilled, sautéed, wok-fried, roasted, or steamed, as in my recipe for Steamed Asparagus with Shallots Vinaigrette. In selecting asparagus, be choosy. Look for firm, plump, straight spears with tightly closed tips, and pass on any that are dry, limp, split, or wrinkled.
During spring months, I like to keep meals simple and light by using lots of seasonal produce and seafood. Have some fun by swapping out vegetables for other seasonal varieties to keep recipes new and fresh.
Seared Scallops and English Peas with Mint
(Makes 4 servings)
- 2½ cups shelled fresh English peas (from 2 pounds peas in the pod)
- 1 slice thick-sliced bacon, cut crosswise into 1/4-inch-wide strips
- 1/2 cup coarsely chopped shallots
- 2 tablespoons coarsely chopped fresh mint
- 12 large sea scallops, tough side muscle removed, patted dry
- 2 tablespoons olive oil
Directions
Bring large saucepan of salted water to boil over high heat. Add peas and cook for 2 minutes, or just until they are bright green and tender. Drain and transfer peas to bowl of ice water to cool. Drain well.
Heat large heavy skillet over medium-high heat. Add bacon and cook, stirring occasionally, for 5 minutes, or until golden and crisp. Using slotted spoon, transfer bacon to paper towels to drain. Pour off all but a thin layer of fat from skillet. Add shallots to skillet and cook, stirring often, for 2 minutes, or until softened. Add peas and cook, stirring often, for 3 minutes, or until they are heated through. Stir in bacon and mint. Season to taste with salt and pepper.
Keep warm over very low heat.
Meanwhile, season scallops with salt and pepper. Heat another large heavy skillet over high heat until it is very hot. Add olive oil, then add scallops and cook for 2 minutes, or until underside is golden brown. Turn scallops and cook for 2 minutes more, or until other side is golden brown but scallops are still translucent when pierced in center. Transfer scallops to paper towels to drain briefly.
Divide pea mixture and scallops among four plates and serve.
Make-Ahead: The peas can be blanched up to 6 hours ahead, cooled, covered, and refrigerated.
Per serving
- Calories: 177
- Total Fat: 8 g
- Saturated Fat: 1 g
- Sodium: 156 mg
- Carbohydrate: 17 g
- Fiber: 6 g
- Protein: 10 g
- Diabetic Exchanges: 1 lean meat, 3 vegetable, 1 fat
Steamed Asparagus with Shallots Vinaigrette
(Makes 4 servings)
- 2 pounds asparagus (about 2 bunches), woody ends trimmed
- 1/2 cup raspberry vinegar
- 2 small shallots, sliced into thin rings
- 1/3 cup grapeseed oil
- 1 tablespoon olive oil
- 2 teaspoons chopped fresh flat-leaf parsley
- 2 teaspoons chopped fresh basil

Directions
Bring large frying pan of water to boil. Add asparagus, sprinkle with salt, and cook for 2 minutes, or until asparagus is crisp-tender. Drain. Submerge asparagus in large bowl of ice-cold water to cool completely. Strain and dry asparagus completely.
In small saucepan, combine vinegar and shallots and bring to simmer over medium heat. Remove from heat and allow to cool. Strain shallots from vinegar and pour vinegar into large bowl. Reserve shallots.
Gradually add grapeseed oil and olive oil to reserved vinegar, whisking constantly to blend. Whisk in parsley and basil and season vinaigrette to taste with salt and pepper.
Arrange asparagus on platter and spoon vinaigrette over the asparagus. Garnish with shallots and serve.
Per serving
- Calories: 259
- Total Fat: 22 g
- Saturated Fat: 2 grams
- Sodium: 5 mg
- Carbohydrate: 14 g
- Fiber: 5 g
- Protein: 5 g
- Diabetic Exchanges: 2 vegetable, 4.5 fat
Recipes courtesy Curtis Stone
This article is featured in the March/April 2020 issue of The Saturday Evening Post. Subscribe to the magazine for more art, inspiring stories, fiction, humor, and features from our archives.
Featured image: Photo by Quentin Bacon
What to Do in Your Kitchen All Day: Beans, Baking, and Braising
Millions of us have taken to our homes during this unprecedented global pandemic. Social distancing is tough, but we all have to do our part in slowing the spread of the virus. If you’ve considered yourself a neophyte in the kitchen, this could be your chance to bone up on baking and slow cooking. Since you’re going to be home for days at a time — and you’re likely cooking anyway — you may as well get some gourmet food out of it. When life hands you isolation, make bread.
Sourdough Starter
Drop everything and mix up a sourdough starter, or levain, right now. In less than a week, you’ll have all you need to bake a wonderfully chewy, crusty loaf of bread.
Sourdough starter is a gooey paste that captures and activates wild yeast to be used for baking. It’s so easy to start, and once you have it you can keep feeding it indefinitely or gift some to friends.
Ingredients
- 1 scant cup flour (x5)
- ½ cup warm water (x5)
Directions
- Mix up the flour and water in medium-to-large glass bowl. Make sure it is mixed thoroughly. Cover the bowl with a towel or plastic wrap and set somewhere warm (around 70-75 degrees).
- Every 24 hours, “feed” the starter with one scant cup of flour and ½ cup warm water and mix it in thoroughly. By the third or fourth day, your starter should be bubbling and smell sour. After the fifth day, discard half the starter (or use it) before feeding. To keep it longer, keep it in the refrigerator, feeding it weekly, or dry it out by smearing it on a cutting board and keeping the flakes in an airtight container.
Walnut Cranberry Loaf
Now that you have your sourdough starter, you can put it to use baking some tasty loaves. Since you won’t be using active dry yeast in this bread, giving it the proper time to rise is crucial. Once you’ve made your first loaf of bread, you can dive into the intricacies of breadmaking. This one is perfect for morning toast or a heavenly turkey sandwich. You’ll be the envy of everyone on your video conference call.
Ingredients
- 1 ½ cups sourdough starter
- 3 cups all-purpose flour
- 1 cup water
- 1 ½ tsp salt
- ¾ cup dried cranberries
- ¾ cup shelled walnuts
Directions
- In your mixer (or with a wooden spoon), combine the starter, flour, water, and salt. Cover and let it sit for an hour.
- Knead the dough using your mixer (or your hands) for five to ten minutes. Add the cranberries and walnuts and lightly fold them into the dough. Let it rest another hour.
- Form the dough into a ball and place it on an oiled pan or cooking stone (the one you will use to bake it). If your kitchen is hot, cover the dough and place the pan in the refrigerator to rise overnight. Otherwise, it can sit covered overnight on the counter.
- Preheat the oven to 450 degrees F and place a pan on the bottom rack. Pour two cups of water into the pan once the oven is hot. When the water starts boiling, put the dough in the center rack. Bake for 30-40 minutes, watching closely for a golden-brown crust. Let the bread cool on a cooling rack.
Baked Black-Eyed Peas
These beans are so versatile you’ll never run out of uses for the leftovers. Make them spicy or tangy and sweet. Substitute any medium-sized bean like adzukis or white beans. Put them on toast with a fried egg and chopped scallions, or serve them on a bed of coconut rice with a cut of pork.
Ingredients
- 3 cups dried black-eyed peas
- 1 tbs extra-virgin olive oil
- 2 onions, sliced
- 2 carrots, chopped
- 1 stalk celery, chopped
- ½ head cabbage, chopped
- 4-6 garlic cloves
- 3 bay leaves
- 5 sprigs fresh thyme
- 2 tsp chili powder
- ½ cup dry white wine
- 1 tsp chicken bouillon (or vegetable bouillon)
- ½ cup fresh grated parmesan or romano cheese
- Salt and pepper
Directions
- Soak the beans overnight in a large mixing bowl with two extra inches of water. Drain and rinse them when you’re ready to cook.
- Preheat oven to 300 degrees F.
- In a large dutch oven, heat the olive oil on medium heat and add onions. Caramelize the onions (you have time, right?) by cooking them until they are a deep tan color (about 45 minutes).
- Add the carrots, celery, and cabbage and continue cooking for about 5 minutes. Add garlic and cook for another 5 minutes.
- Deglaze the pot with the white wine. Cook for about a minute, then add the chicken bouillon, beans, thyme, bay leaves, chili powder, and enough water to cover it all. Bring the pot to boil, then cover and put into the oven. (You can instead transfer the contents to a slow cooker at this point if you’d prefer.)
- Cook for four to six hours, covered. Uncover, stir in cheese, salt, and pepper, and bake, uncovered for another half-hour to an hour.
Khara Masala Braised Leg of Lamb
This recipe was adapted from an old Indian cookbook I found in a used bookstore years ago. If you’re reticent to cook lamb, this will make a believer out of you. I serve it with curried cauliflower and super spicy cabbage.
Ingredients
- 1 6-8-pound leg of lamb, bone in
- 2 tbs extra-virgin olive oil
- 2 medium onions, chopped
- 1 tbsp grated ginger
- 4 garlic cloves, sliced
- 6 whole dried red chiles
- 3 cardamom pods
- 2 cinnamon sticks
- 3 cloves
- Fresh cilantro
- 3 cups chicken stock
- Salt and pepper
Directions
- Turn on oven broiler. Salt and pepper the leg of lamb and place it on a pan on a rack in the center of the oven. Brown each side, about 20-25 minutes total.
- Preheat oven to 300 degrees F. In a dutch oven, heat oil on medium and add onions. Cook for five minutes, until translucent. Add ginger, garlic, and chiles, cooking for another five minutes.
- Remove from heat and add cardamom, cinnamon, cloves, cilantro, leg of lamb, and chicken stock. Cover and place in center rack of oven.
- Cook for around five hours, or until fork tender, occasionally spooning the stock over the leg of lamb. Serve with fresh cilantro. Strain the stock from the dutch oven to make gravy or refrigerate for later.
Featured image: Shutterstock
Curtis Stone’s Great Homemade Pizza
If Americans could only eat one food for the rest of their lives, the No. 1 choice is pizza, according to a recent survey conducted by the Harris Poll. From New York to Chicago to California, we consume more than 3 billion pizza pies each year.
Nothing beats a fresh-out-of-the-oven pizza, and making it at home is easier than you think. The basics are simple — dough, toppings, heat. Where you go from there is up to you.
Great pizza begins with great crust. I always say fresh is best, and my dough recipe can be made in the food processor or by hand.My favorite toppings change with the seasons, but only use about three. Experiment with a blend of cheeses. While mozzarella is the classic pizza cheese, Fontina, Gruyère, and Gorgonzola are other options that melt well and deliver lots of flavor.
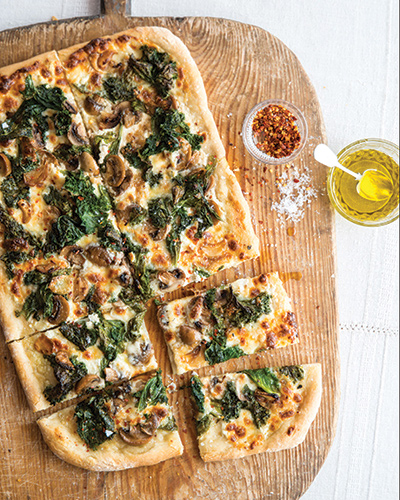
I consider Portobello Mushroom Pizza with Prosciutto and Arugula an elevated pepperoni and mushroom pizza, but not as heavy. There is a nice earthiness to White Pizza with Mustard Greens and Mushrooms — the slight bitterness of the mustard greens marries well with the umami of the mushrooms.
Do as the Italians do! For authenticity, I like to drizzle pizza with extra-virgin olive oil before slicing and serving.
Portobello Mushroom Pizza with Prosciutto and Arugula

(Makes 2 servings)
- 1 10-ounce pizza dough (see recipe) or purchased
- 8 ounces portobello mushrooms (2), stems and gills removed
- 2 tablespoons extra-virgin olive oil
- 3 garlic cloves, minced
- 3/4 cup shredded mozzarella cheese
- 1/4 cup finely grated Parmesan cheese
- 1 thin slice prosciutto
- 1 ounce baby arugula
Place large baking stone on bottom shelf in oven; preheat oven to 450˚.
To roast mushrooms: Place mushrooms on baking sheet, coat with 1 tablespoon oil, and season with salt and pepper. Bake on top rack, turning mushrooms over halfway through baking, about 10 minutes or until tender. Cool and then cut mushrooms into ½-inch-wide slices. In small bowl, mix 1 tablespoon oil with garlic.
To make the pizza: Using oven mitts, remove pizza stone from oven and set on pizza rack. Stretch dough to about an 11-inch round and lay over stone. Drizzle garlic-oil mixture over dough. Sprinkle half of each cheese over dough, and then top with mushroom slices and sprinkle remaining cheeses. Using oven mitts, return pizza stone to oven and bake pizza for about 7 minutes, or until crust is crisp and golden brown. Remove pizza stone from oven and return it to pizza rack. Tear prosciutto into strips and arrange them on pizza, and then sprinkle arugula over pizza. Cut into wedges and serve.
Make-Ahead: The portobello mushrooms can be roasted, cooled, and sliced up to 8 hours ahead, covered, and refrigerated.
Per serving (with pizza dough)
- Calories: 453
- Total Fat: 16 g
- Saturated Fat: 5 g
- Sodium: 309 mg
- Carbohydrate: 59 g
- Fiber: 4 g
- Protein: 19 g
White Pizza with Mustard Greens and Mushrooms
(Makes 4 servings)
- 1/4 cup olive oil
- 2 tablespoons finely chopped shallots
- 2 garlic cloves, sliced
- 1 bunch mustard greens, stems removed, leaves coarsely chopped (about 8 ounces of leaves)
- 2/3 cup whole milk
- 2 ounces part-skim milk ricotta
- All-purpose flour, for dusting
- 1 15-ounce ball pizza dough (see recipe) or purchased
- 4 ounces mozzarella cheese, shredded
- 3 ounces button mushrooms, thickly sliced
- 11/2 tablespoons extra-virgin olive oil, for drizzling
- Crushed red pepper flakes, for serving (optional)
Position rack in lowest position in oven and preheat oven to 500°. Heat large sauté pan over medium heat. Add olive oil, shallots, and garlic and cook for about 1 minute. Working in batches, add mustard greens and cook for about 4 minutes, or until wilted. Sprinkle with salt and pepper and transfer to plate lined with paper towels to drain. In small bowl, whisk milk and ricotta until smooth. Season with salt and pepper.
Turn 13-x-9-inch baking sheet upside down and lightly dust with flour. Transfer dough to baking sheet. Using rolling pin, roll dough over baking sheet. Spread ricotta mixture over dough. Top with mozzarella, then greens and mushrooms. Bake for about 20 minutes, or until crust is crisp and cheese is golden. Drizzle pizza with extra-virgin olive oil, slice, and serve. Sprinkle with red pepper flakes, if desired.
Make-Ahead: Ricotta mixture can be made up to 1 day ahead, covered, and refrigerated. Greens can be cooked up to 4 hours ahead, cooled, covered, and refrigerated.
Per serving (with pizza dough)
- Calories: 560
- Total Fat: 25 g
- Saturated Fat: 5 g
- Sodium: 388 mg
- Carbohydrate: 49 g
- Fiber: 3 g;
- Protein: 22 g
Pizza Dough
(Makes 3 10-ounce dough balls or 2 15-ounce balls)
- 1 cup warm water
- 1/3 cup good-quality dry white wine
- 1 tablespoon dry yeast
- 1 tablespoon honey
- 1 tablespoon olive oil
- 3 cups unbleached bread flour
- 1 1/2 teaspoon kosher salt
In 2-cup measuring cup, whisk warm water, wine, yeast, and honey to blend. Set aside 5 minutes, or until foamy. Mix in oil. Place flour and salt in food processor. With machine running, mix in yeast mixture (dough will be wet). Transfer dough to floured work surface and knead 3 minutes, or until it is smooth, elastic, and very tacky but releases from hands. Form into three 10-ounce or two 15-ounce balls. Place on sheet pan and dust top with flour. Cover with plastic wrap. Place dough in warm area 45 minutes, or until it rises and doubles.
Make-Ahead: Once dough balls are formed, store airtight and freeze up to 1 month. Allow extra time for dough to rise before using.
Per 10-ounce dough ball
- Calories: 907
- Total Fat: 48 g
- Saturated Fat: 11 g
- Sodium: 718 mg
- Carbohydrate: 119 g
- Fiber: 7 g
- Protein: 38 g
Portobello Mushroom Pizza recipe: From Relaxed Cooking with Curtis Stone by Curtis Stone. Copyright © by Curtis Stone with permission of Clarkson Potter. All rights reserved; White Pizza Recipe: Courtesy Curtis Stone; Pizza Dough recipe: Excerpted from The Bakeware Cookbook by Rochelle Palermo. Copyright © 2017 by Rochelle Palermo. Excerpted by permission of Rochelle Palermo and Curtis Stone. All rights reserved. No part of this excerpt may be reproduced or reprinted without permission in writing from the publisher.
This article is featured in the January/February 2020 issue of The Saturday Evening Post. Subscribe to the magazine for more art, inspiring stories, fiction, humor, and features from our archives.
Featured image: Shutterstock
Curtis Stone’s Seafood Christmas
In Australia, seafood takes center stage during Christmas. Sharing Aussie traditions with my American friends and family reminds me of home, where Christmas falls in the middle of summer. I start a holiday meal by passing around a plate of oysters, but why not extend the lighter fare into the main course?
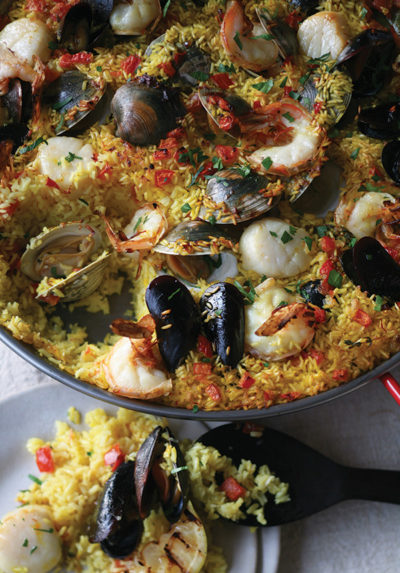
Surprise holiday guests by serving Seafood Paella — a big beautiful pan of saffron-infused rice, topped with assorted seafood — that makes an impressive entrance from the oven to the table. Who doesn’t love that?
Though it might seem intimidating at first, paella is actually fairly simple to prepare, and since it’s a one-pot meal, clean-up is much easier. And seeing as it goes into the oven 35 minutes before serving, there is nothing for you to do except enjoy your company. I serve paella in the pan it was prepared in and make it the centerpiece of the table, encouraging everyone to dig in and serve themselves. A nice, simple green salad is a great side for paella. And don’t forget the sangria!
Another option for holiday entertaining is Shellfish with White Wine, Lemon, and Parsley that you can virtually make in the time it takes to set the table. Don’t worry too much about what kind of seafood to use — it’s delicious with whatever you can get your hands on. I like to serve this dish individually with a side of crusty bread.
Keep entertaining stress-free by planning ahead, prepping in advance, and enjoying a nice glass of wine while you cook. Happy Holidays!
Seafood Paella
(Makes 6 servings)
- 1/4 cup olive oil
- 3 shallots, finely chopped
- 3 garlic cloves, minced
- 3 sprigs fresh thyme
- 2 bay leaves
- 2 pinches saffron
- 2 cups long-grain white rice
- 1/2 cup dry white wine
- 3/4 teaspoon salt
- 4 cups low-sodium chicken broth, warmed
- 1 tomato, seeded, diced
- 6 mussels, scrubbed and debearded
- 6 Manila or littleneck clams, scrubbed
- 6 colossal shrimp, halved lengthwise and deveined (with shells left intact)
- 6 sea scallops
- 1 tablespoon coarsely chopped fresh flat-leaf parsley
- 1 tablespoon extra-virgin olive oil
- 1 lemon, halved
Preheat oven to 425°F. Heat olive oil in 12-inch paella pan or ovenproof skillet over medium heat. Add shallots and sauté 2 minutes. Add garlic, thyme sprigs, and bay leaves and sauté 1 minute, or until shallots are tender and translucent. Sprinkle saffron over shallot mixture and sauté 1 minute. Add rice and stir 2 minutes, or until pan is quite dry and rice is coated with oil. Stir in wine and salt, then chicken broth. Stir rice to distribute it evenly in pan. Bring to simmer over high heat, then remove pan from heat. Sprinkle tomato over rice mixture.
Carefully transfer pan to oven and bake the paella uncovered for about 20 minutes, or until rice is almost tender. Nestle mussels, clams, shrimp, and scallops into paella and continue baking for 15 minutes, or until rice is tender and seafood is just cooked (discard any mussels and clams that do not open). Sprinkle with chopped parsley and drizzle with extra-virgin olive oil. Squeeze lemon juice over paella and serve.
Per serving
- Calories: 421
- Total Fat: 13 g
- Saturated Fat: 2 g
- Sodium: 565 mg
- Carbohydrate: 56 g
- Fiber: 1 g
- Protein: 14 g
- Diabetic Exchanges: 3 starch, 1.5 lean meat, 0.5 vegetable, 2.5 fat
Shellfish with White Wine, Lemon, and Parsley
(Makes 4 servings)
- About 8 tablespoons extra-virgin olive oil
- 2 shallots, finely diced
- 4 garlic cloves, finely chopped
- 2 sprigs fresh thyme
- 2 bay leaves
- 2 lobster tails, split lengthwise
- 8 ounces colossal shrimp in the shells
- 1 pound fresh small clams, scrubbed
- 1 pound fresh mussels, scrubbed and debearded
- ½ cup dry white wine
- 3 tablespoons coarsely chopped fresh flat-leaf parsley
- 1 ½ tablespoons extra-fine capers
- Juice and zest of 1 lemon
- Country-style crusty bread
Heat 2 tablespoons of oil in large heavy sauté pan over medium heat. Add shallots and sauté for 30 seconds. Stir in garlic, thyme, and bay leaves. Add lobster and shrimp, toss gently to coat, and cook for 2 minutes. Add clams and cook for about 2 minutes. Add mussels and cook for about 5 minutes, or until mussels and clams begin to open.
Pour in wine and immediately cover with lid and cook for 1½ minutes, or until clams and mussels open completely. Add parsley, capers, lemon juice, and lemon zest, and toss to combine. Remove from heat and stir in remaining extra-virgin olive oil to taste. Season with salt and black pepper.
Divide seafood mixture among 4 serving bowls. Serve with crusty bread.
Per serving
- Calories: 704
- Total Fat: 35 g
- Saturated Fat: 5 g
- Sodium: 1,990 mg
- Carbohydrate: 18 g
- Fiber: 1 g
- Protein: 70 g
- Diabetic Exchanges: 5 lean meat, 6 fat
Curtis Stone is the chef/owner of Maude and Gwen restaurants in Los Angeles. Curtis shares another great seafood recipe, Halibut and Spinach with Orange–Pine Nut Vinaigrette, at saturdayeveningpost.com/stonehalibut.
This article is featured in the November/December 2019 issue of The Saturday Evening Post. Subscribe to the magazine for more art, inspiring stories, fiction, humor, and features from our archives.
Featured image: photo by Quentin Bacon
How to Host Thanksgiving for Different Diets
Anyone celebrating Thanksgiving with a group of people who all adhere to the exact same diet has much to be thankful for indeed. Can you imagine? For the rest of us, it’s a yearly tradition of juggling preferences, dietary decisions, and strict allergies. However, accommodating for dietary restrictions on Thanksgiving doesn’t have to be so taxing that you forget it’s a four-day weekend. With some planning, you can make all of your guests feel comfortable without adding the work of a four-star chef to your holiday.
There are a few things to remember when you have guests who require some tweaks to the feast menu:
- Ask about your guests’ needs ahead of time. The sooner you know what people can and can’t eat, the more time you have to prepare an accommodating meal.
- They don’t need to eat every single dish on the table. People with specific diets are used to opting out of certain foods. Remember that, between every dish available, much of your spread will probably meet their needs. They will likely be ecstatic if you make anything special at all.
- Everything doesn’t have to be made from scratch. We are living in the golden age of specialty grocery stores where you can find a cornucopia of packaged products to suit almost every need. They will also have dietary restrictions marked clearly, to eliminate any confusion.
- Use index cards to mark special dishes on the buffet. Just because your nephew’s fiance is vegan, that doesn’t mean she wants a big discussion about it. She’ll be thankful for your discretion.
- Ask your guests to bring a dish to the party. If you’re feeling overwhelmed with dietary caveats, there’s nothing wrong with asking people to “pitch in” a side that suits their needs. If you do, ask this of all your guests so it doesn’t seem as though you’re put out and can’t be bothered to accommodate your friends with dietary restrictions.
Think of guests with dietary needs as an opportunity to learn new skills in the kitchen and improve your resume as a gracious host. Here are some of the most common diets, along with some dishes you can prepare to wow your meatless and wheatless company.
Gluten-Free
People following a gluten-free diet steer clear of grains like wheat, barley, and rye. In cases of celiac disease, this diet is necessary, but some follow it for health benefits. Gluten is fairly easy to avoid in homemade food (if you aren’t using flour or the aforementioned grains), but it can be tricky to be sure about processed foods if they don’t display a gluten-free (GF) label. The recipe below for Cornbread and Wild Rice Stuffing is a sure thing for non-gluten guests.
This rice flour gravy from The Kitchn is also an easy alternative, as is this Green Bean Casserole from Gluten-Free on a Shoestring.
Vegetarian
Vegetarians don’t eat meat or fish, and that means no meat-based stocks either. Side dishes are easy to make vegetarian by just omitting meat or fish, and you can serve a protein-rich, animal-free main course that even the turkey-eaters will love. Make some simple Red Lentil Meatballs from the recipe below, and check out our guide to making your own meat alternatives.
Vegan
Whereas vegetarians eschew meat, a vegan diet avoids all animal products. Vegan foods will contain no meat, fish, dairy, eggs, or honey. Gelatin is also off-limits. Some side dishes, like mashed potatoes and stuffing, are easy to make vegan. Our recipe for Miso Gravy is a flavorful alternative that assures your vegan guest can still celebrate like the rest of us.
Field Roast’s Celebration Roast is easy to find in stores, and this Quinoa and Kale-Stuffed Acorn Squash from Veganosity is another winner.
Lactose Intolerance
The sugar found in dairy products, lactose, can’t be digested easily by some people. Conveniently, vegan and paleo foods are safe for the lactose intolerant. The recipe below for Baked Butternut Squash Mac and Cheeze is a dairy-free delight.
Brooklyn Farm Girl’s Dairy-Free Mashed Potatoes are a simple alternative you can make alongside your regular mashed potatoes by adding another step.
Paleo
The paleo diet, or caveman diet, limits adherents to foods eaten during the Paleolithic era — lean meats, fruits, vegetables, nuts, seeds, and fish — no grains, beans, potatoes or dairy. The hunter-gatherers at your Thanksgiving table might be okay with leniency on this diet during the holidays, but, if not, you can still provide some caveman-style sides to go with the turkey. Check out the easy recipe for Mashed Cauliflower below.
We also like this Roasted Brussels and Bacon from Nom Nom Paleo and this Chocolate Chip Coconut Banana Bread from Ambitious Kitchen.
Cornbread and Wild Rice Stuffing (Gluten-Free)
- 1 pan gluten-free cornbread, cut and dried like croutons
- 1 cup black rice
- ¼ cup unsalted butter
- 2 celery ribs, minced
- 1 large yellow onion, diced
- 2 ½ cups chicken broth
- 1 tbsp chopped sage leaves
- ¼ cup chopped parsley leaves
- 2 eggs
- Salt and pepper
Instructions:
Melt butter in a pan. Add onion and celery, and cook until fragrant. Add chopped sage and cook for another 2 minutes. Set aside to cool.
Cook rice according to package instructions. It’s okay if the rice is a little undercooked, since it will be cooked more anyway.
In a mixing bowl, combine the cornbread croutons, cooked rice, contents of the pan, parsley, and chicken broth. Stir. Whisk the eggs and add to the bowl.
Transfer the mixing bowl into a buttered baking dish. Cover and bake at 350° F for 45 minutes. Uncover and bake until the top is browned, about 45 minutes more.
Red Lentil Meatballs (Vegetarian)
- 1 cup dried red lentils
- 2 medium sweet potatoes
- ½ cup dried couscous
- 2 garlic cloves, minced
- 1 medium onion, diced
- 1 tsp olive oil
- 2 tsp dried oregano
- 2 tsp dried basil
- 1 tsp vegetarian bouillon
- Salt and pepper (to taste)
- Crushed red pepper flakes (to taste)
- 1 tsp smoked paprika (optional)
Instructions:
Cook the lentils. Bring the water to a boil, then lower it to a simmer until the lentils are done.
Dice the sweet potatoes and boil them until they slide off the tines of a fork.
Cook the couscous according to instructions.
Sauté the onion and garlic lightly in olive oil.
Add all ingredients into a mixing bowl and stir thoroughly. Alternatively, you can blend everything together in a food processor for a smoother texture. Pulse the food processor several times, making sure you don’t overmix.
Form the mixture into 1-inch diameter balls, and space them out on an oiled baking sheet. Cook at 400° F for 10 to 15 minutes, then flip the meatballs and lower the oven temperature to 350° F. Cook for another 20 to 30 minutes.
Serve them in a marinara sauce with parmesan and fresh basil, or make meatball subs.
Miso Gravy (Vegan)
- 3 tbsp vegan butter
- ¼ cup flour
- 1 tbsp white miso paste
- 3 cups vegetable broth (or mushroom broth)
- 1 dash soy sauce
- ¼ tsp onion powder
- Fresh ground black pepper
Instructions:
Melt vegan butter in a pan. Add the flour and stir to create a thick paste.
At the same time, add the miso paste to the broth and heat. Stir to combine.
Add the broth-miso mixture, soy sauce, and onion powder to the pan. Stir vigorously. Add fresh ground pepper and cook to desired thickness. Remember the gravy will thicken more as it cools.
Baked Butternut Squash Mac and Cheeze (Lactose Free, Vegetarian)
- 1 medium butternut squash, halved, with seeds and guts removed
- 2 tsp olive oil
- Salt and pepper
- 1 can coconut milk
- ½ cup nutritional yeast
- 1 tbsp Dijon mustard
- ½ tsp garlic powder
- ½ tsp onion powder
- 1 16-oz. box dried macaroni noodles
- ½ cup panko breadcrumbs, or homemade breadcrumbs
- ½ tsp smoked paprika
Instructions:
Lightly coat the inside of each squash half with olive oil and salt and pepper, then place them face down on a baking sheet and bake at 400° F for 20 minutes.
Once the squash has cooled, scoop the insides of each half into a food processor or blender. Add in the coconut milk, nutritional yeast, Dijon, garlic powder, and onion powder, and process until smooth.
Cook the macaroni noodles according to box instructions. Drain the noodles and combine with the sauce in a baking dish. Top with smoked paprika and panko breadcrumbs and bake at 350° F for 30 minutes.
Mashed Cauliflower (Paleo, Vegan)
1 large head cauliflower, cut into florets
¼ cup almond or coconut milk
2 tbsp olive oil
3 cloves garlic, minced
2 tbsp fresh chives, chopped
Instructions:
Boil 1 ½ inches of water in a pot. Place a steamer basket into the pot and fill with cauliflower florets. Cover and steam for about 12 minutes, or until completely tender.
Remove the pot from heat and remove the basket, allowing it to drain completely. Empty the pot and place it back on the stove at low-medium heat. Add the garlic and cook, stirring, until it is just browning.
Remove the pot from heat and add garlic and almond milk. Using an immersion blender, or a food processor, blend the contents of the pot completely. Top with fresh chives and serve.
Featured image: Shutterstock
The Best Soups You Haven’t Made Yet
2016 was a taxing year for many people in this country, but for me it was downright intolerable. That year, I was cruising up I-95 outside Richmond, Virginia in my beige Corolla when I found myself in the middle of a five-car pileup. My car was totaled, but I was relatively unscathed. Weeks later, I got dumped by a partner of four years. Then, I drunkenly tripped over a shrub and shattered my jaw on a concrete sidewalk.
I thought about my year of misfortune when I awoke in a hospital bed, metal wiring braided around my teeth. My jaw was wired shut for six weeks, a procedure called maxillomandibular fixation. I could speak — with difficulty — but chewing was just not going to happen. 2016 was the year I bought an immersion blender.
For a month and a half, I was restricted to a liquid diet. I would sulk in the corners of restaurant booths sipping mediocre tomato soup from a straw while my family reveled over pizza and salads, gaily munching croutons and laughing with their moveable mouths.
Drinking and smoking were both inadvisable (and my hydrocodone prescription was running out), so I turned to the kitchen to take the edge off, chopping onions and celery and breaking in my stockpot. I finally had no option but to tinker with blended soup recipes like a mad scientist.
Each morning, I made a chocolate smoothie with bananas and tofu, and in the evenings I pushed aromatics and root vegetables to their flavorful limits. I became obsessed with making the perfect soup because there was nothing else I could eat. For much of my life, soup had been a last-resort food to fall back on in the interest of time or money. It came in a can with bland ingredients and too much salt. My own soups, however, were feats of sorcery, complex layers of spice, earthiness, and acidity hidden in simple and elegant liquid concoctions. Plus, there was a spot where my right molars were busted out, and the soup could go down my throat easily if I positioned the straw correctly.
Soup has a popular reputation as a cozy accompaniment for cool weather, the fuzzy sweater of the food world. For me, the stuff is a reminder of the hardest year of my life, but also the cuisine that saved me from completely wasting away.
At the end of my stint of looking like the James Bond villain Jaws on a diet, my doctor told me to readjust slowly to solid food. I should start with hummus and cottage cheese or something. Naturally, I went straight for a yellowfin tuna steak, seared rare, on a salad of cucumber, cabbage, and cilantro. I sat before my meal, rubbing my hands together in anticipation. Weeks of deprivation had led to this moment. When I raised the fork to my mouth and sank my teeth into a morsel, the soreness was overwhelming. I felt I might never again have the strength to gnaw on a cucumber. Dejected, I returned to the kitchen and to my trusty stockpot, where I found I could always simmer some salvation in the worst of times.
Roasted Root Soup
- 1 ½ lbs. carrots, chopped into 1-inch pieces
- 1 medium parsnip, chopped into 1-inch pieces
- 1 large rutabaga or turnip, chopped into 1-inch pieces
- 1 large beet, chopped into 1-inch pieces
- 1 large onion, diced
- 1 stalk celery, diced
- Salt and pepper
- 4 garlic cloves, minced
- 4 sprigs rosemary
- 6 cups chicken stock or mushroom broth
- Juice of ½ lemon
- Crème fraiche, or sour cream, for serving
- Walnut oil, for serving (optional)
- Toss root vegetables with olive oil and salt and pepper and spread onto a lined baking sheet. Bake at 350° F for 30 minutes.
- Heat oil in a large pot over low-medium heat. Add onion and celery, and cook for about 5 minutes. Add garlic and cook for another 5 minutes.
- Add chicken stock and rosemary. Bring to a boil, then lower heat to simmer for 20 minutes. Add cooked root vegetables to the pot and simmer for another 5 to 10 minutes.
- Remove from heat. Remove rosemary. Blend the soup with an immersion blender or in batches in a countertop blender. Add lemon juice and salt and pepper to taste.
Cauliflower Soup with Gruyere Croutons
- 2 heads cauliflower, cut into florets
- 1 medium onion, diced
- 2 cloves garlic, minced
- Salt and pepper
- 4 sprigs fresh thyme
- 1 bay leaf
- 4 cups chicken stock or vegetable broth
- ½ cup heavy cream
- Fried bacon crumbles, for serving (optional)
For Gruyere croutons:
- ½ baguette, cut or broken into 1-inch squares
- 1 cup gruyere or emmental cheese, sliced thin
- Heat oil over medium heat in a large pot. Add onion and cook until it is translucent. Add cauliflower florets and garlic. Cook for 5 to 10 minutes, stirring occasionally.
- Add chicken stock, thyme, and bay leaf. Bring to boil, then lower heat to simmer for 20 to 30 minutes.
- Remove from heat. Remove bay leaf and thyme. Add heavy cream. Use an immersion blender to blend the soup, or do it in batches on a countertop blender. Add salt and pepper to taste.
- For croutons, toast the baguette pieces on a baking sheet in the oven at 250° F. Top with gruyere slices and broil until the cheese is browned.
Spicy Squash and Lentil Soup (Vegan)
- 1 large butternut squash, halved, with seeds and guts removed
- 1 shallot, diced
- 3 cloves garlic, minced
- 1 2-inch piece of ginger, peeled and minced
- 1 habanero pepper, diced
- ½ tsp dried oregano
- ¼ tsp ground coriander
- 1 tsp ground cumin
- ½ tsp curry powder
- ¼ tsp paprika
- 3 cups vegetable broth
- ½ cup dry red lentils
- 1 14-oz. can unsweetened coconut milk
- 1 tbsp dark brown sugar
- salt and pepper
- Lightly coat the inside of each squash half with olive oil and salt and pepper, then place them face down on a baking sheet and bake at 400° F for 20 minutes.
- Heat oil over medium heat in a large pot. Add shallot, garlic, and ginger and cook for 5 minutes. Add diced habanero, oregano, coriander, cumin, curry powder, and paprika and cook for another 2 minutes.
- Add vegetable broth. Scoop roasted butternut squash into the pot. Add lentils. Bring the pot to boil, then lower to simmer for 20 minutes.
- Once the lentils are cooked through, remove the pot from heat and use an immersion blender to blend the soup, or work in batches with a countertop blender. Add coconut milk and dark brown sugar, and season to taste with salt, pepper, and other spices.
Monkfish Bisque
- 2 monkfish filets
- Black peppercorns
- 1 bay leaf
- 1 medium onion, diced
- 1 carrot, chopped
- 1 stalk celery, chopped
- 2 garlic cloves, minced
- 2 tbsp tomato paste
- 1 cup dry rosé wine, or dry white wine
- 1 tsp smoked paprika
- 1 sprig fresh thyme
- 2 sprigs fresh tarragon
- 3 cups seafood stock
- ½ cup white rice, rinsed
- 1 cup heavy cream
- Salt and pepper
- Chives, for serving
- Bring a pot of water to boil. Add salt, peppercorns, and bay leaf. Lower the heat to simmer, and add the monkfish filets. Cook for about 5 minutes, or until cooked through, then set aside. Reserve one cup of water.
- Heat oil at medium heat in a large pot. Add onion, carrot, and celery. Cook for about 5 minutes, then add garlic and cook for another 2 minutes. Increase heat and add tomato paste and wine. Cook the wine off.
- Add seafood stock, reserved monkfish water, thyme, tarragon, and smoked paprika. Bring the soup to a boil, then lower to simmer. Add rice to the pot and cook, covered, for 30 minutes.
- Blend the soup using an immersion blender or work in batches with a countertop blender. For a smoother result, pass the blended soup through a sieve, pressing on the solids to extract as much liquid as possible. Heat the soup on low heat and add heavy cream and poached monkfish. Add salt and pepper to taste. Top with chives.
Bruschetta Gazpacho
- 2 lbs. tomatoes, peeled and seeded
- 2 large cucumbers, peeled and seeded
- 1 orange or red bell pepper, chopped
- 2 cloves garlic
- 1 shallot, chopped
- ¼ cup extra virgin olive oil
- 1 tbsp balsamic vinegar
- 1 tbsp sherry vinegar, or red wine vinegar
- 30 basil leaves, chopped
- 1 handful of day-old baguette, crust removed
- Salt and pepper
Add ingredients to a food processor or blender and blend to desired consistency. When adding the bread, let it soak in the mixture for a few minutes before blending. Serve chilled, with a soft-boiled egg and sour cream.
Featured image: Shutterstock.com.
Curtis Stone’s Halibut and Spinach with Orange–Pine Nut Vinaigrette
(Makes 4 servings)
- 1/3 cup extra-virgin olive oil
- 1/4 cup champagne vinegar or white wine vinegar
- 3 tablespoons very finely chopped shallots
- 2 tablespoons honey
- 1 tablespoon chopped fresh tarragon
- Finely grated zest of 1 orange
- 1/4 cup pine nuts, toasted and coarsely crushed
- Four 5-ounce skinless halibut fillets
- 2 tablespoons olive oil
- 2 shallots, thinly sliced into rings
- Two 6-ounce bags fresh baby spinach
To make the vinaigrette
In small bowl, mix olive oil, vinegar, shallots, honey, tarragon, and orange zest with fork to combine (but not emulsify). Stir in pine nuts. Season to taste with salt and pepper. Set aside.
To cook the fish
Season halibut with salt and pepper. Heat large non-stick skillet over high heat. Add 1 tablespoon oil, then add halibut and cook, without moving it, for about 3 minutes, or until deep golden brown on underside. Turn halibut over and cook for about 3 minutes more, or just until it is barely opaque in center when flaked with tip of small knife. Transfer to plate.
To cook the spinach
Wipe out skillet and return it to medium-high heat. Add remaining 1 tablespoon olive oil, then add shallots and cook, stirring occasionally, for about 2 minutes, or until they just begin to soften. Add spinach in batches and stir for about 1 minute, or just until it begins to wilt. Season to taste with salt and pepper.
To serve
Divide spinach among four dinner plates. Top each with a fillet. Spoon vinaigrette over fillets and spinach mixture. Serve immediately.
Per serving
- Calories: 624
- Total Fat: 48 g
- Saturated Fat: 7 g
- Sodium: 182 mg
- Carbohydrate: 21 g
- Fiber: 5 g
- Protein: 33 g
- Diabetic Exchanges: 4 lean meat, 1 vegetable, 9 fat
Featured image: Ray Kachatorian.
Make Your Own Meat Alternatives
The Impossible Burger is possibly the most popular meatless meat in the country. Beyond Meat, MorningStar, and Gardein have all been riding a recent wave of plant-based protein demand as well. Whether for environmental, health, or ethical reasons, people are cutting down on animal protein and turning to fake meats. You don’t have to shell out for name brand veggie meats in order to get your fix, though. Synthesize your own meat substitutes with these Saturday Evening Post-tested recipes.
Red lentil, couscous, sweet potato meatballs
These “meatballs” are packed with nutrition and flavor. They can serve as a punch of protein in so many dishes, but you might just end up eating them by hand with a zesty barbecue dipping sauce.
- 1 cup dried red lentils
- 2 medium sweet potatoes
- ½ cup dried couscous
- 2 garlic cloves, minced
- 1 medium onion, diced
- 1 tsp olive oil
- 2 tsp dried oregano
- 2 tsp dried basil
- 1 tsp vegetarian bouillon
- Salt and pepper (to taste)
- Crushed red pepper flakes (to taste)
- 1 tsp smoked paprika (optional)
Instructions:
- Cook the lentils. Bring the water to a boil, then lower it to a simmer until the lentils are done.
- Dice the sweet potatoes and boil them until they slide off the tines of a fork.
- Cook the couscous according to instructions.
- Sauté the onion and garlic lightly in olive oil.
- Add all ingredients into a mixing bowl and stir thoroughly. Alternatively, you can blend everything together in a food processor for a smoother texture. Pulse the food processor several times, making sure you don’t overmix.
- Form the mixture into 1-inch diameter balls, and space them out on an oiled baking sheet. Cook at 400° F for 10 to 15 minutes, then flip the meatballs and lower the oven temperature to 350° F. Cook for another 20 to 30 minutes.
- Serve them in a marinara sauce with parmesan and fresh basil, or make meatball subs.
Beet, chickpea, quinoa burgers
The high iron content of beets gives these burgers a beefy taste that will satisfy vegetarians and meat eaters alike. If you want to make a meatless burger, make it this one.
- 4 medium beets
- 1 15 oz. can garbanzo beans, drained
- ½ cup dried quinoa
- 2 tsp dried oregano
- 1 tsp cumin
- ½ cup ground walnuts
- 1 egg
- Salt and pepper (to taste)
Instructions:
- Roast the beets whole at 400° F until you can poke a fork to the center of them. Let them cool, then peel the skins off.
- Cook the quinoa according to instructions.
- Combine all of the ingredients in a mixing bowl. Alternatively, use a food processor for a smoother texture. Pulse the food processor several times, making sure you don’t overmix.
- Form the mixture into patties and space them out on an oiled baking sheet. Bake at 350° F for 30 to 40 minutes, flipping them halfway through.
- Serve your beet burgers on a bun with your favorite fixings. For a delicious twist, top these patties with arugula, heirloom tomato slices, and avocado.
Tofu chorizo
With only a few ingredients (and a whole lot of spices), you can make a tasty chorizo substitute to dress up your favorite dishes. Whoever said tofu is bland never tried this surefire crowd pleaser.
- 2 blocks extra firm tofu
- 1 medium onion, diced
- 2 garlic cloves, minced
- 1 tbs cumin
- 1 tbs chili powder
- 1 tsp ground coriander
- ½ tsp cinnamon
- ½ tsp cayenne pepper
- 2 tbs apple cider vinegar
- 1 tsp soy sauce or tamari
- 1 tsp olive oil
- pepper (to taste)
Instructions:
- Remove the tofu from the package, and press it to eliminate excess moisture. Wrap the blocks in paper towel and set a cookbook (or something else with weight) on them.
- Sauté the onion and garlic in oil. Crumble the pressed tofu into the pan, making chunks similar to the size of chorizo. Cook the tofu for 5 to 10 minutes, stirring often, until most of the water has cooked off, then add in the spices, vinegar, and soy sauce.
- Continue stirring the tofu until most of the moisture has cooked off. Serve your tofu chorizo in tacos with cilantro, jalapenos, and lime, or mix it in with a breakfast skillet.
Seitan, white bean chicken patties
This one is not for anyone following a gluten-free diet. Seitan, the protein-rich product with particularly meaty texture, has taken vegan restaurants by storm over the years, but you can make it yourself. And it’s not as difficult as you might imagine! Follow steps 1-3 to make basic seitan. You can use it in a myriad of recipes that call for chicken, or continue for frying instructions.
- 1 cup vital wheat gluten
- 2 tbs nutritional yeast
- 2 tsp onion powder
- 2 tsp garlic powder
- ¾ cup vegetable broth (for recipe) + 6 cups vegetable broth (for cooking)
- 1 15 oz. can white beans, drained
- Salt and pepper
Batter:
- ¾ cup flour
- 2 tsp garlic powder
- 1 tsp dried parsley
- pepper
- ¾ cup almond milk
- 1 cup breadcrumbs
- 1 cup vegetable or peanut oil
Instructions:
- Combine vital wheat gluten, nutritional yeast, onion powder, garlic powder, and salt in a mixing bowl and stir. Add the ¾ cup vegetable broth.
- In a separate bowl, empty the white beans and mash them with a fork. Add the mashed beans to the seitan dough.
- Knead the dough until it is somewhat elastic. Form patties from the dough and space them out on a deep baking sheet (They will grow significantly, so make them small). Pour the remaining broth over the patties to cover them, and bake them at 350° F for an hour, flipping them halfway through.
- Cool the seitan patties on a cooling rack, then mix together the batter (dry ingredients first, then wet). Cover each patty completely with the batter, then coat with breadcrumbs.
- Heat the oil to medium-high heat, and carefully fry each patty, cooking three to five minutes on each side or until golden brown.
- These versatile “chicken” patties can be used in a vegetarian chicken parmesan, chicken sandwiches, or a piccata.
Featured Image: Magdanatka on Shutterstock
Curtis Stone’s Spring Harvest Treats
I look forward to cooking with and eating fruits and vegetables that haven’t been available for months. Spring produce varies wildly from the heavier root vegetables of winter. Lighter and more delicate vegetables, like peas, asparagus, and fava beans, are the star players of the season.
Asparagus might be my favorite spring vegetable. Its peak season — April — is brief, just like my favorite ingredient, truffles. I dedicated an entire menu — including dessert — to the spear at my restaurant Maude.
Spring is about bright, fresh, light meals, like Grilled Scallops with Fava Beans and Roasted Tomatoes. All three delicate, distinctive flavors work beautifully together in this simple and delicious dish. A good hot pan is important for this recipe. Look for the scallops to turn a lovely golden color and caramelize with an opaque center.
Asparagus and Parmesan Risotto is a quintessential spring dish. The asparagus pairs nicely with the creaminess of the Parmesan risotto. The secret to cooking risotto is time and patience. Stir the pot every 30 seconds or so, adding stock gradually to ensure the risotto will be creamy, not porridge-y. Keep the heat just right and the stock hot, so you’re constantly simmering the risotto. Cook the rice until it’s al dente, with the center of each grain slightly firm.
Grilled Scallops with Fava Beans and Roasted Tomatoes
(Makes 6 servings)
-
- 12 ounces cherry tomatoes
- 2 tablespoons plus ¼ cup extra-virgin olive oil
- 1 1/4 pounds fresh fava bean pods, shelled
- 3 tablespoons champagne vinegar
- 2 tablespoons finely chopped fresh mint leaves
- 12 jumbo sea scallops
Preheat oven to 400°F. Place tomatoes in small baking dish. Drizzle with 1 tablespoon oil and gently shake dish to coat; season with salt and pepper. Transfer tomatoes to oven and roast until heated through and just beginning to split, about 15 minutes. Remove from oven and let cool slightly.
Bring medium saucepan of salted water to boil over high heat. Prepare an ice-water bath. Add fava beans to boiling water and cook for 1 to 2 minutes. Drain and transfer to ice-water bath to cool. Drain, peel beans, and set aside.
In medium bowl, whisk together vinegar and ¼ cup oil until well combined. Add tomatoes, fava beans, and mint; toss to coat. Season with salt and pepper.
Preheat large heavy-bottomed skillet over medium-high heat. Rub scallops with remaining tablespoon oil and season with salt and pepper. Place scallops seasoned-side down in skillet; cook 2 minutes. Season with salt and pepper and turn; cook until they are just opaque in the center and golden brown on both sides, about 2 minutes more. Scallops should not be cooked all the way through.
Divide tomato and fava bean salad evenly among 6 plates. Top each salad with 2 scallops; drizzle with any remaining vinaigrette from salad and serve immediately.
Per serving
- Calories: 269
- Total Fat: 15 g
- Saturated Fat: 2 g
- Sodium: 130 mg
- Carbohydrate: 21 g
- Fiber: 8 g
- Protein: 17 g
- Diabetic Exchanges: 1.3 lean meat, 3.75 vegetable, 3 fat
Asparagus and Parmesan Risotto
(Makes 6 servings)
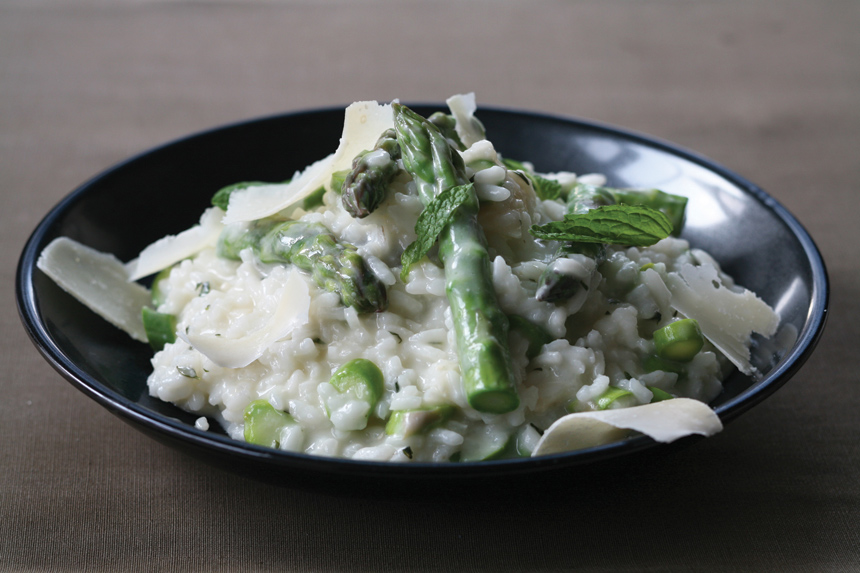
- About 8 cups low-sodium vegetable stock
- 2 tablespoons olive oil
- 3 shallots, finely diced
- 2 garlic cloves, finely chopped
- 3 sprigs fresh thyme
- 2 cups Arborio rice
- 3/4 cup dry white wine
- 1 1/2 pounds thin asparagus, woody ends removed, stalks cut into 1 1/2-inch lengths
- 3 tablespoons butter, cut in small pieces
- 1/3 cup grated Parmigiano-Reggiano cheese
- 3 tablespoons mascarpone cheese
- 2 tablespoons finely chopped fresh flat-leaf parsley
- 1/4 cup finely chopped fresh mint leaves Juice of 1/2 lemon
Bring vegetable stock to a simmer in large saucepan. Reduce heat to very low and keep stock on heat.
Heat oil in large heavy saucepan over medium heat. Add shallots, garlic, and thyme and sauté for 2 minutes, or until shallots are tender but not browned. Add rice and sauté for 30 seconds to coat with the oil. Stir in wine and cook for 3 minutes or until it is absorbed.
Add ¾ cup hot vegetable stock and cook, stirring constantly, until it is absorbed. Continue adding hot stock, ¾ cup at a time, and stirring until each addition has been absorbed, for about 22 minutes, or until rice is al dente (the center of each grain of rice should still be slightly firm).
Add asparagus and continue to cook for 2 minutes. Discard thyme stems (thyme leaves should have fallen off stems and into risotto). Remove risotto from heat, and add butter, Parmigiano-Reggiano, and mascarpone cheese. Stir until butter has melted. Stir in parsley, mint, and lemon juice and season the risotto with salt and pepper.
Divide risotto among 4 warmed serving bowls and serve.
Per serving
- Calories: 490
- Total Fat: 19 g
- Saturated Fat: 9 g
- Sodium: 231 mg
- Carbohydrate: 61 g
- Fiber: 3 g
- Protein: 12 g
- Diabetic Exchanges: 3.5 starch, 0.5 lean meat, 1.5 vegetable, 3.5 fat
Curtis shares another great spring recipe, Bruschetta with Spring Pea Pesto and Burrata, at saturdayeveningpost.com/bruschetta.
Curtis Stone is the chef/owner of Maude and Gwen restaurants in Los Angeles.
This article is featured in the March/April 2019 issue of The Saturday Evening Post. Subscribe to the magazine for more art, inspiring stories, fiction, humor, and features from our archives.
Recipes adapted from Relaxed Cooking with Curtis Stone by Curtis Stone. Copyright © 2009 by Curtis Stone. Excerpted with permission of Clarkson Potter. All rights reserved.
Featured image credit: Photography by Quentin Bacon.
Curtis Stone’s Bruschetta with Spring Pea Pesto
Bruschetta with Spring Pea Pesto
(Makes 6 servings)
- 1 cup loosely packed fresh basil leaves
- 1 cup loosely packed fresh mint leaves
- 5 tablespoons extra-virgin olive oil
- 1 ½ teaspoons grated lemon zest
- 1 tablespoon fresh lemon juice
- Six ½-inch-thick slices ciabatta bread
- 1 small shallot, finely chopped
- 1 garlic clove, finely chopped
- 1 ½ cups shelled fresh English peas (from 1 ½ pounds peas in pod)
- 3 ounces burrata or fresh mozzarella, at room temperature
- 1 tablespoon freshly grated Parmesan cheese
Preheat oven to 350°F. In small food processor, combine basil, mint, 4 tablespoons oil, lemon zest, and juice and process until nearly smooth. Season to taste with salt. Leave pesto mixture in food processor.
Heat grill pan over medium-high heat. Grill ciabatta for about 3 minutes per side, or until lightly toasted and grill marks form. Transfer to plate.
Heat medium heavy skillet over medium heat. Add remaining 1 tablespoon oil then add shallot and garlic and sauté for about 2 minutes, or until tender and translucent. Add peas and cook for about 5 minutes, or until they are cooked through but still crisp-tender. Remove from heat.
Add half of warm pea mixture to pesto and pulse until peas are coarsely chopped. Transfer mixture to bowl and fold in remaining warm pea mixture. Season with salt.
Divide burrata among bruschetta and season with salt and pepper. Spoon pesto over, sprinkle with Parmesan, and serve immediately.
Per serving
- Calories: 415
- Total Fat: 17 g
- Saturated Fat: 3 g
- Sodium: 701 mg
- Carbohydrate: 50 g
- Fiber: 4 g
- Protein: 14 g
- Diabetic Exchanges: 3 starch, 0.5 lean meat, 1.25 vegetable, 2.5 fat
Recipe adapted from Good Food, Good Life by Curtis Stone. Copyright © 2015 by Curtis Stone. Excerpted with permission of Ballantine Books, a division of Random House LLC. All rights reserved.
Image Credit: Photograph by Ray Kachatorian