7 Tips to Turn Your Apartment Balcony into a Cozy Oasis
We’re all spending a lot of time at home these days. In the summertime, it’s a godsend to have a backyard. But if you live in an apartment, you might have to make do with a balcony. That doesn’t mean you can’t have an outdoor haven for working from home or evening relaxation. Follow these tips to make the most of your tiny patio and turn it into the perfect outdoor retreat.
1. Start with the Floor
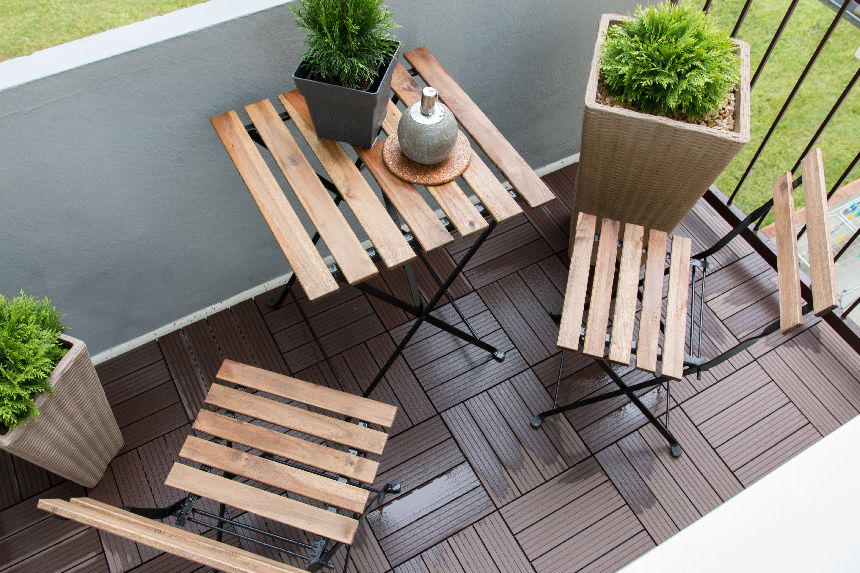
Sprucing up the drab concrete floor of your balcony can do a lot to change the space. Visit your local international grocery store to find outdoor rugs for a reasonable price. Alternatively, you can buy deck tiles that snap together, or go an oddball route with something like AstroTurf. If you’re a fan of colorful patterns — and if you’re ready for a project — consider painting your concrete balcony floor using a stencil to give the illusion of tiles. (Make sure to check with your landlord before making any permanent changes.)
2. Get Creative to Save Space
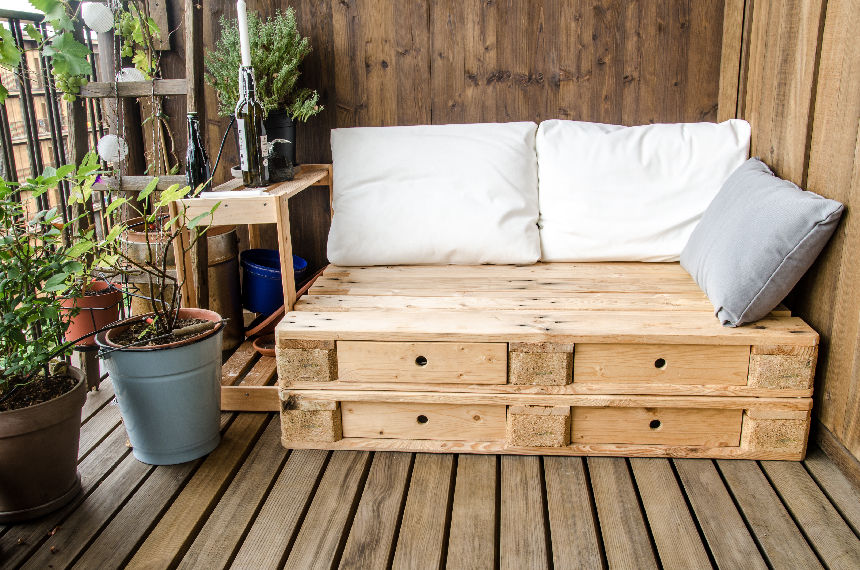
When it comes to balconies, going wild with outdoor furniture can cost you precious space. You can avoid this pitfall with a rail bar. These bar tops attach to your balcony railing. You can purchase one online, or you could try constructing it yourself. If you decide to DIY, make sure it’s as solid as a rock and has a sturdy backing so you don’t send mojitos flying to the street below.
Consider furniture that doubles as storage, like an outdoor bench that opens up like a chest. Of course, this one is DIYable as well. These are perfect for keeping your gardening paraphernalia out of the way.
3. Add Greenery
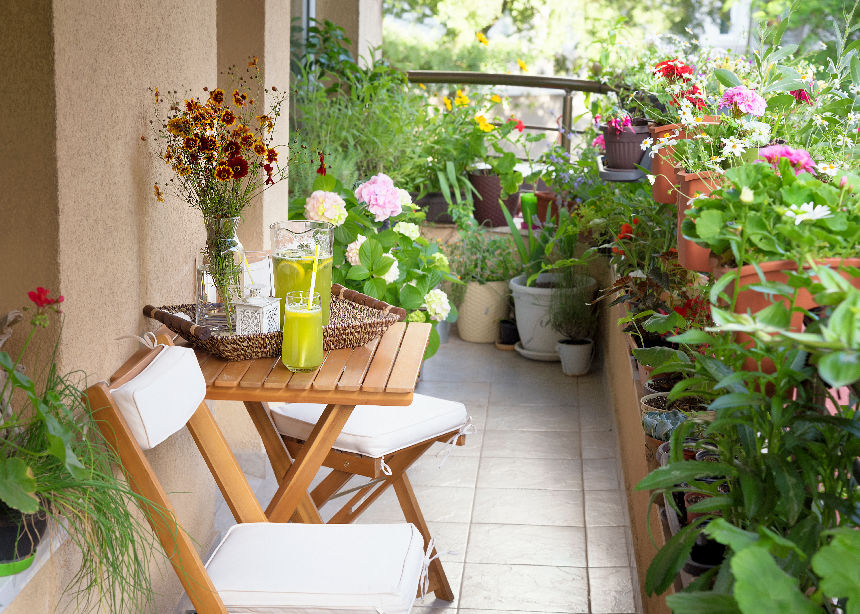
Some type of flora is necessary to create the ideal balcony retreat. If you’re new to gardening, start by assessing the kind of sunlight your balcony gets. Full sun (six or more hours of direct sun) will allow for some different options than partial sun or full shade. Don’t limit yourself to leafy decorative tropicals and succulents, either. Grow vegetables and herbs — like bell peppers or Thai basil — to get the most out of your outside space.
4. Light It Up
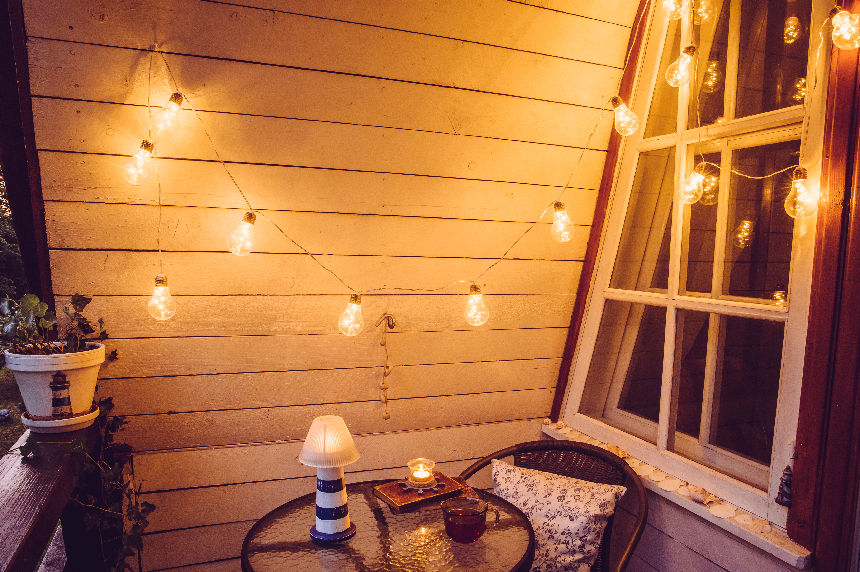
The classic lighting choice for a balcony is a trusty package of string lights. But you don’t have to settle for this old standby. There are plenty of other options for outdoor lighting— some of them solar — to make your balcony seem like an extension of your house. Go for a nice bronze reading lamp or a modern globe floor LED light.
5. Keep the Mosquitoes Away
A lot of us would spend so much more time outside if it didn’t come with the threat of being eaten alive by mosquitoes. Those summertime bloodsuckers are pesky, but you don’t have to suffer for an evening in the moonlight. Some solutions that come highly recommended are the Thermacell Patio Shield and, for a natural option, the Mintronella repellant candle.
6. Suspend Your Seating
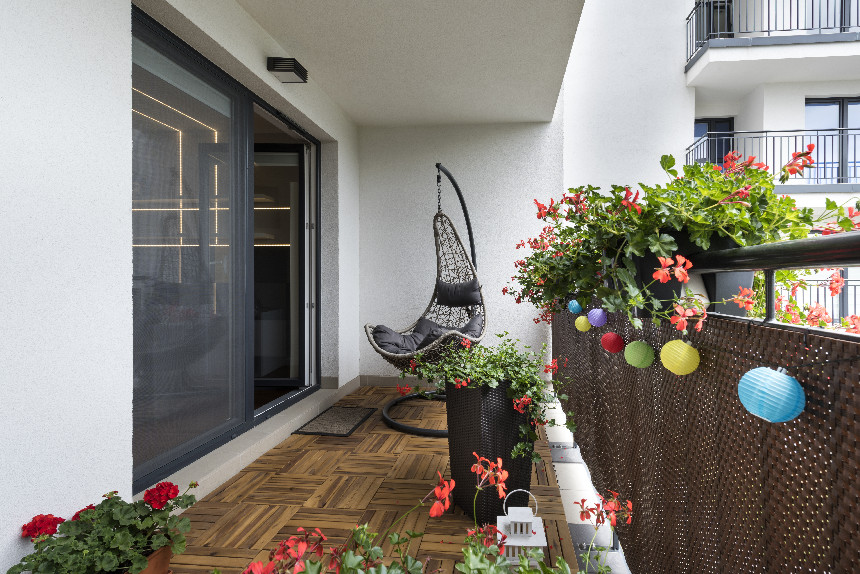
For a fun, swinging seating option, install a wicker egg chair that hangs from a steel chain. (Check out the best way to safely mount a swing chair.) Comfortable and charming, hanging seating also adds style to your space. For outdoor dozing and reading, a hammock is a very affordable option to turn your balcony into a cozy spot.
7. Make It Private and Shady
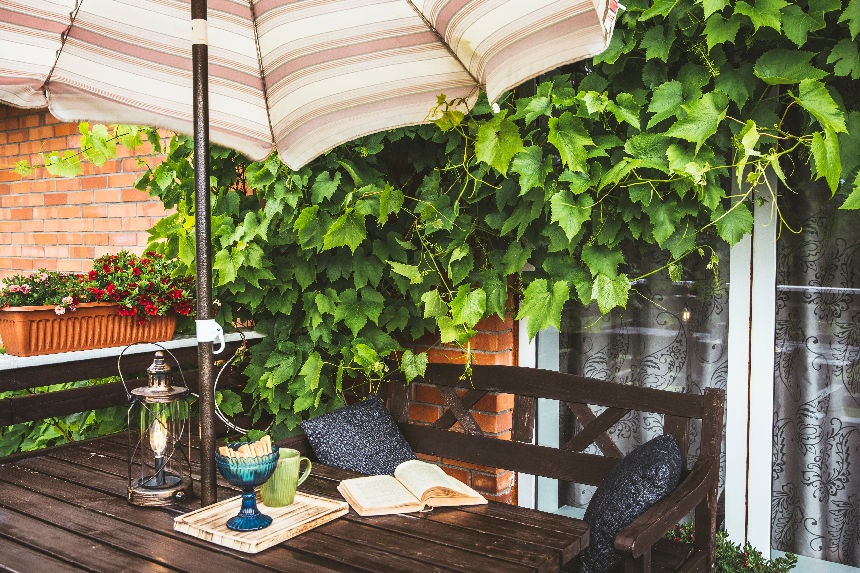
If you plant right, some strategic greenery can close off your balcony to neighbors and onlookers. Alternatively, installing some outdoor curtains will give you an adjustable screen for shade and privacy. There are many other options, like bamboo panels or inexpensive lattice. For a quick and sleek shade solution, consider a shade sail.
Featured image: Shutterstock
How to Keep an Orchid Alive
“The worst instructions ever perpetrated on orchid growers is the suggestion to water with ice cubes,” says Ron McHatton, the Chief Science and Education Officer at the American Orchid Society. “These are tropical plants. Do you want your feet in ice water?”
Of course, not all orchids are tropical, but the ones McHatton is recommending for you — a novice orchid owner — are. They are called Phalaenopsis, and they are an “easy” houseplant to grow.
That might be disheartening to read if you’ve ever killed one, but McHatton says you only need some better advice to keep a moth orchid thriving in your home. Step one: save the ice for your martinis.
Orchids are one of the most diverse families of flowering plants in the world. Their unique blooms beguile expert growers and casual plant lovers alike. The Phalaenopsis family boasts more than 60 species, though you’ll have to do some hunting to find more than a handful that are commonly cultivated.
The most important factor in orchid care might be the place you choose to purchase your plant. Those colorful blooms greeting you at the entrance of your favorite big-box department store might be enticing, but McHatton says you’re better off going with a local orchid dealer or nursery. A knowledgeable grower can answer questions about your plant and give you practical advice for growing it in whatever conditions you face. It’s unlikely that the cashier at Target will harbor the same expertise.

Furthermore, McHatton says, many orchids sold at big-box stores are doomed from the start: “I’ve seen lots of plants in stores where the die has already been cast. The plants already have a root-rotting fungus before they’re even purchased.” The reason for this, sometimes, is that the plants are sold growing in sphagnum moss. While this is an acceptable substrate for orchids, it holds water longer than others. This gives the plants more moisture for the long periods of time they could be sitting on a shelf, and that could cause problems. Before buying an orchid, inspect the roots to make sure they look healthy and firm.
And once you get the thing home? McHatton says, “don’t stick them in a shady corner and overwater them.” Put your orchid in a bright spot by a window, and allow it to dry out before each watering.
It isn’t exactly as straightforward as it sounds, though. There isn’t a one-size-fits-all watering regimen for Phalaenopsis orchids, because it depends largely on the kind of pot and substrate you’re using, not to mention the humidity of the room. Sphagnum moss dries out the slowest, then coconut chips, bark, and clay pellets. For the vessel, a plastic pot will take longer to dry out, then terra cotta, and a slotted clay pot or a basket will dry the fastest. The combination that you use should match your watering habits as well as the environment you can offer.
An orchid might be okay in a slotted pot with coconut chips in a moderately bright, humid bathroom, but the same plant will have a hard time sitting over a heating vent in winter. McHatton refers to a person’s ability to pick up on a plant’s needs as a “plant sense,” and he says it works the same way with many houseplants. If you can keep it alive long enough to see it thrive while you’re treating it well, you’ll know what it wants.
Repotting plants is an inevitable stage of houseplant care, but McHatton says newbie growers need not repot their orchid right away. It damages the roots and stresses the plant during an already stressful transition from one place to another. When you do repot, McHatton says to rinse out coconut chips and bark first to remove any remaining salts from the manufacturer.
Watering an orchid plant is just as straightforward as watering most other houseplants. Run water over the roots for 30 seconds or so to flush out salts from your tap water, and leave it to mostly dry out before repeating. The problem with using ice cubes is that the salts from trickling water compound on the plant’s roots and substrate without being fully rinsed away.
Generally, orchids prefer an environment with higher humidity. Spritzing them with a spray bottle is fine, but it won’t create any lasting humidity. If you feel your orchid is drying out a little too quickly, it might benefit from some nearby plant friends. Ferns and peace lilies surrounding the plant will keep the air around the orchid moist, particularly if you water them often. As a last resort, you can set the orchid pot in a tray of water that will moisten the pot and immediate air without wetting the roots.
Do you feel as though you’ve mastered Phalaenopsis orchids, and you want something a little more challenging? McHatton says the next steps are Lady’s Slippers and Cattleyas, two genuses that require slightly more light and stringent watering routines, but offer bloom shapes and sizes that differ from the Phalaenopsis genus. He warns against going wild if you’re struck with plant fever, though. “We get so enamored by the plant that we buy everything we see and then we try to figure out how to grow it,” McHatton says. “It’s much easier to try to grow the plants that are better suited to the conditions you can provide.”
Ron McHatton hosts a monthly webinar on orchid care on the American Orchid Society website.
Featured Image: Natalie Board on Shutterstock
House Detective: Finding History in Your Home
Like the 250-year-old house from Ipswich in the Smithsonian’s National Museum of American History, your home has a story to tell and a place in history. Whether you own your house, rent it, or live in an apartment, you and your family can become house detectives and discover the history of your home.
1. Start at home. The best source about your home is the building itself, and everyone in the family can join in this part of the investigation. Look at the separate parts of the building—roof, walls, chimneys, doors, windows, and foundation. Note what materials they are made of and how the different parts are joined to one another. Try to distinguish original materials from later additions.
Look at the style of the house, too, inside and out (and use the books listed on the back panel of this brochure to help identify building styles and materials). The style of a building is a clue to its age—but not proof. In some parts of the country, a building style stays popular longer than in others. Keep careful notes and take pictures. The clues you record will be useful later on in your investigation.
2. Go to the courthouse, or wherever deed records are kept in your community. Using deed records, you can create a chronological list of all of the owners of a piece of property. The list you compile will be the backbone of your home’s history.
Ask for the index to deeds by buyer. Start with the deed to the present owner. Note the seller’s name and the legal description of the property. Then use the index to find the seller’s deed to the same piece of property and note whom the seller bought it from. Work your way back through the deeds to the original owner, make a copy of each deed, and keep track of the page and volume numbers. A sharp increase in the value of the property could mean a building was added to it.
3. Look at other public records, especially if you find gaps in the deed records. Sometimes property passes from one owner to another through a mortgage or a will, and these documents will probably be wherever you found the deeds (or at least nearby).
Mortgage records often contain detailed descriptions of buildings. Wills and other probate records may list one or more of the previous owners, and you can examine the records filed under their names to see if there are any mentions of the property. Local tax records may reveal the dates of additions and improvements to property by a change in its valuation, and maps of property made by surveyors can show a tool shed or a well that no longer exists. Be sure to make photocopies of all the records that you think will be helpful.

Photo courtesy of the National Museum of American History.
City directories often list people’s occupations as well as addresses and can help to establish the dates that a person lived at a particular address. A librarian can also direct you to federal and state census records. They can contain vast amounts of information about households.
A good library or Internet project for children is to create a timeline of American history starting with the approximate construction date of your building. When the kids have completed a simple timeline for the nation, the family can work together to combine it with the timeline for your home and look for connections. You might find a
link between a big event in American history and a small event in your home’s history.
5. Read a map. Your librarian can guide you to city and county maps that may show your building with the owner’s or resident’s name written beside it. Such maps often show the location of old roads and other landmarks that may have disappeared. Insurance maps, especially those produced by the Sanborn Map Co., contain a wealth of information about individual structures, including the materials from which they were built.
6. Look at a picture. Your local library or historical society may have old photographs of your building, or there may be some in your neighbors’ attics. Postcards can be helpful, too. Many towns are represented in nineteenth-century lithographs called “bird’s-eye views,” which sometimes provide an accurate picture of every residence in town. Don’t forget to take a few photographs of your home for the project, or better yet, have children in the family take the photographs or draw pictures of your building.
7. Talk to people. Try to track down former residents or their children. They may be able to help you date changes or tell you stories about their lives in your home. Neighbors can be helpful, too, if they have lived in the neighborhood a long time. The whole family can put together a list of questions to ask the neighbors about your home and neighborhood. While you are talking to them, ask if they have any family pictures that might show your building in the background.
8. Put it all together. When you have finished your research, you will have a stack of written notes, photocopies of documents and maps, and photographs. These are like the pieces of a puzzle. Use them to create a timeline of your home’s past and to write a narrative history. Enlist everyone in the family to help create a scrapbook that weaves together the narrative history, photocopies, drawings, and photographs, and then make enough copies to give your family and friends. Be sure to place a copy in your local historical society or library, so that your home will have a place in history.
9. Is the building you’re living in brand new? Then start your own history of your home. Using some of the steps outlined above, find out what was there before your building was built and why the neighborhood changed. Then take photos of your home and write about your experiences living in it. You will be making history for your family and community.
Further reading. These books to may help in your research:
Barbara J. Howe. Houses and Homes: Exploring Their History.
Nashville, Tennessee: American Association
for State and Local History, 1987.Howard Hugh. How Old Is This House?
New York: Noonday Press, 1989.Sally Light. House Histories: A Guide
to Tracing the Genealogy of Your Home.
Spencertown, New York: Golden Hill Press, 1997.Virginia and Lee McAlester. A Field Guide to American Houses.
New York: Alfred A. Knopf, 1997.
Visit the “Within These Walls…” website at
http://americanhistory.si.edu/house.